¶ Download and basic integration
¶ Download EMMA iOS SDK
¶ Swift Package Manager (SPM)
You can add the EMMA SDK with SPM starting from version 4.9.0+ and requires Xcode 12 or higher.
Example steps for integration:
- Open Xcode and select
File > Add Package Dependencies... - Add the SDK URL
https://github.com/EMMADevelopment/eMMa-iOS-SDK. - In the version configuration:
- Select the “Up to Next Major Version” option.
- Specify the minimum version as
4.12.0. This ensures that you always use the latest versions within the4.xrange.
- Verify that the SDK has been correctly integrated into your project.
The latest version of the SDK is 4.16.0. See this page for details on updates.
¶ Cocoapods
The latest version of EMMA is available via CocoaPods:
- Install CocoaPods using
gem install cocoapods. - If you are using CocoaPods for the first time, you can optionally run
pod setupto download the repository with all the "specs" and check them locally, this will directly create a copy of the GitHub repository. - Create a file in your Xcode project called
Podfile. - Then add the line:
pod 'eMMa'. - Finally, run in the Xcode project directory the following:
pod install.
Once done, CocoaPods will download and install the EMMA library by creating a new .xcworkspace file. Finally, open this file in Xcode.
¶ Manual Download
To download manually follow the steps below:
- Download the latest version of
EMMA_iOS.xcframeworkfrom the following link. - Add
EMMA_iOS.xcframeworkto your Xcode project in theFrameworks, Libraries,and Embedded Contentsection. - Select
Embed and Sign. - If you are using an extension for the push notification service add
EMMA_iOS.xcframeworktoFramework and Librariesand selectDo Not Embed. - Run the project.
¶ Basic integration
NOTE: This is the minimum requirement to start measuring installations of your App.
¶ Dependencies
-
Obtain EMMA's
Session Key.See the documentation to see where you can get your
EMMA Keyat the EMMA documentation page.
¶ Initialize the library
The place where it makes more sense to initialize the EMMA library is in the application(_:didFinishLaunchingWithOptions:) method.
First we must import the EMMA module import EMMA_iOS and call the method EMMA.startSession(with:) with the data of your Session Key.
Example of basic integration:
import UIKit
// Import EMMA SDK
import EMMA_iOS

@UIApplicationMain
class AppDelegate: UIResponder, UIApplicationDelegate {
    var window: UIWindow?

    func application(_ application: UIApplication, didFinishLaunchingWithOptions launchOptions: [UIApplication.LaunchOptionsKey: Any]?) -> Bool {
        let configuration = EMMAConfiguration()
        configuration.debugEnabled = true
        configuration.sessionKey = "MY_EMMA_SESSION_KEY"

        EMMA.startSession(with: configuration)
        return true
    }
}
import SwiftUI
import EMMA_iOS

class AppDelegate: NSObject, UIApplicationDelegate {
    var window: UIWindow?

    func application(_ application: UIApplication, didFinishLaunchingWithOptions launchOptions: [UIApplication.LaunchOptionsKey : Any]? = nil) -> Bool {
        // EMMA uses window to display some InApp Messages
        self.window = UIWindow(frame:UIScreen.main.bounds)

        let configuration = EMMAConfiguration()
        configuration.sessionKey = "MY_EMMA_SESSION_KEY"
        EMMA.startSession(with: configuration)
        return true
    }
}

@main
struct EMMASwiftUiApp: App {
    @UIApplicationDelegateAdaptor(AppDelegate.self) var appDelegate

    var body: some Scene {
        WindowGroup {
            ContentView()
        }
    }
}
#import "AppDelegate.h"
// Include EMMA SDK Header
#import <EMMA_iOS/EMMA_iOS.h>

@interface AppDelegate ()

@end

@implementation AppDelegate

- (BOOL)application:(UIApplication *)application didFinishLaunchingWithOptions:(NSDictionary *)launchOptions {

    EMMAConfiguration *configuration = [EMMAConfiguration new];
    configuration.sessionKey = @"MY_EMMA_SESSION_KEY";
    configuration.debugEnabled = true;

    [EMMALegacy startSessionWithConfiguration:configuration];
    return YES;
}

@end
¶ Disable screen sending
Screen sending is active by default in the EMMA SDK. To disable it use the following configuration:
import UIKit
// Import EMMA SDK
import EMMA_iOS

@UIApplicationMain
class AppDelegate: UIResponder, UIApplicationDelegate {
    var window: UIWindow?

    func application(_ application: UIApplication, didFinishLaunchingWithOptions launchOptions: [UIApplication.LaunchOptionsKey: Any]?) -> Bool {
        let configuration = EMMAConfiguration()
        configuration.debugEnabled = true
        configuration.sessionKey = "MY_EMMA_SESSION_KEY"
        configuration.trackScreenEvents = false // disable screens

        EMMA.startSession(with: configuration)
        return true
    }
}
#import "AppDelegate.h"
// Include EMMA SDK Header
#import <EMMA_iOS/EMMA_iOS.h>

@interface AppDelegate ()

@end

@implementation AppDelegate

- (BOOL)application:(UIApplication *)application didFinishLaunchingWithOptions:(NSDictionary *)launchOptions {

    EMMAConfiguration *configuration = [EMMAConfiguration new];
    configuration.sessionKey = @"MY_EMMA_SESSION_KEY";
    configuration.debugEnabled = true;
    configuration.trackScreenEvents = false; // disable screens

    [EMMALegacy startSessionWithConfiguration:configuration];
    return YES;
}

@end
¶ Upgrades from previous versions
If you are upgrading from a previous version of the SDK, check this page first for possible implementation changes.
¶ Acquisition Integration
Documentation for integrating the ability to manage acquisition campaigns:
¶ SKAdNetwork 4.0 integration
SKAdNetwork (SKAN) is a tool released by Apple that allows advertisers to measure campaign performance without violating user privacy. This means that identifiers with IDFA or IDFV are not used to track the user, nor does it require the consent of the user in the ATT.
To implement this functionality it is necessary to integrate SDK version 4.12.0 or higher.
Since iOS 15 Apple allows you to send these copies of postbacks, not only to advertisers as it has been doing up to now, but to any endpoint previously added in the app's configuration.
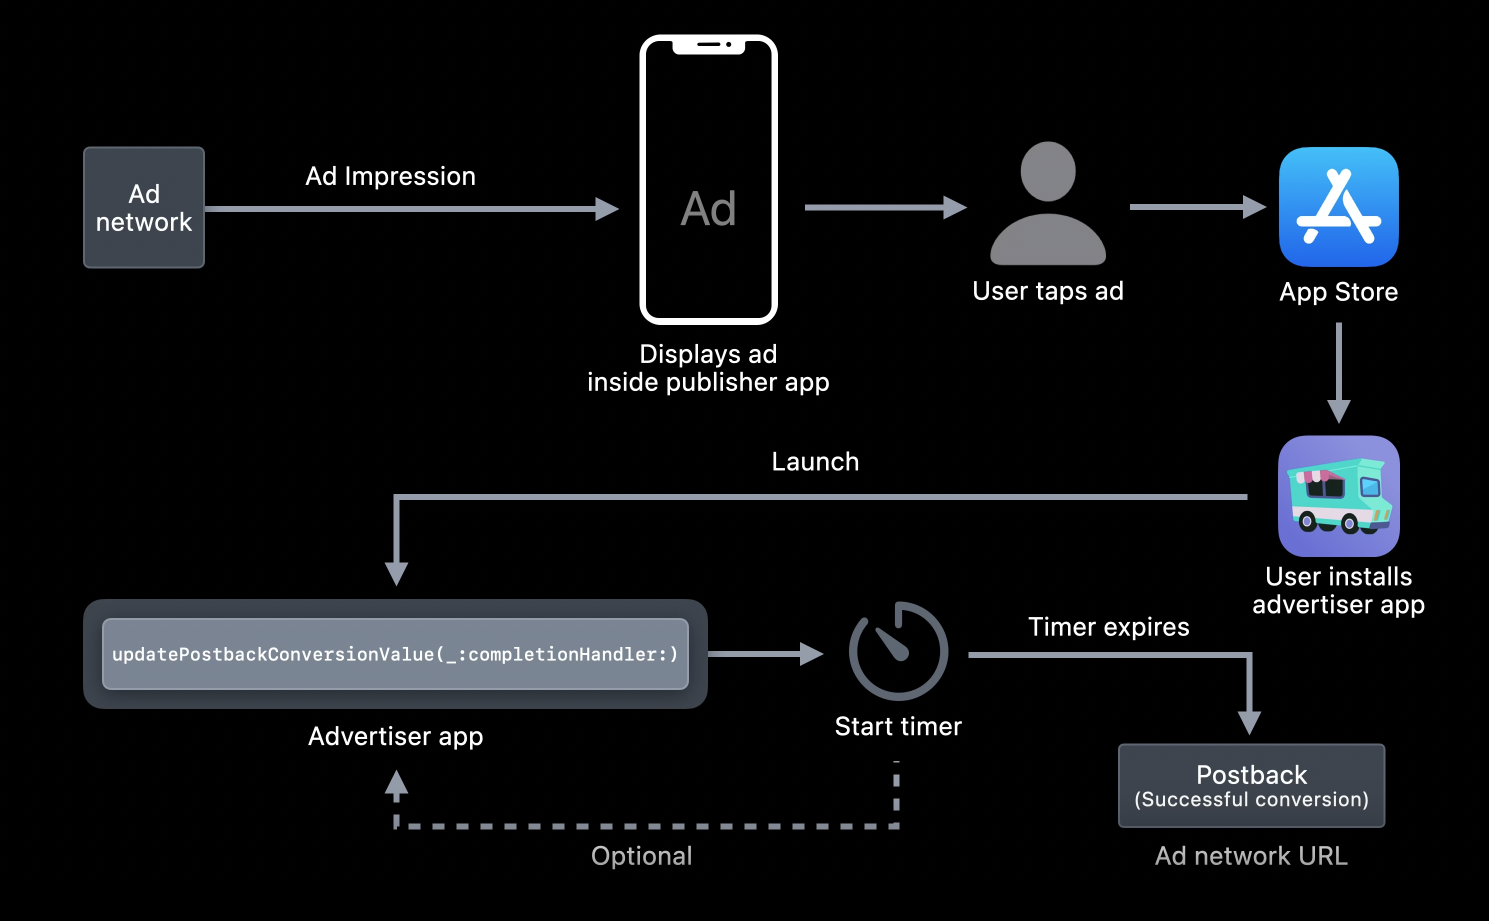
How does the SKAdNetwork work? First, the advertiser shows an ad from an app (Advertiser app) in its own application or in a third-party application (Publisher app). The user views the ad, clicks on it, and the advertised app is downloaded from the AppStore. The user then opens the app, the EMMA SDK notifies SKAdNetwork of the app opening in the EMMA.startSession(with:) method, and Apple sends a copy of the postback to our domain added in the info.plist .
For SKAdNetwork 3.0 and below, the postback is sent after the attribution window which is from 0 to 24 hours. It is not possible to know exactly when it is sent since Apple does it randomly in the 24 or 48 hours after the end of the 24-hour window.
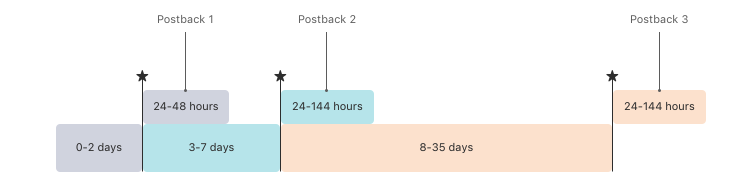
For SKAdNetwork 4.0, up to 3 postbacks are sent after each attribution window. The delivery is made 24h-48h later for the first postback and 24h-144h for the second and third postbacks. In this case, it is not possible to predict the shipping time either, since it does so randomly within the windows. In the following image you can see the window of each postback and its corresponding delay.
To register the EMMA domain in the info.plist of the app, follow these steps:
-
Add the
NSAdvertisingAttributionReportEndpointkey to theinfo.plistof the app (for details see Apple documentation). -
Add
https://emma-skadnetwork.comas the value of the key. It is important that the value has exactly this format.
Once the domain is added to the info.plist, make sure that the app contains the StoreKit.framework. The StoreKit.framework is the framework that handles communication with SKAdNetwork starting with iOS 14+. To make sure the app works correctly add StoreKit.framework to the app as Optional.
How can I test the integration? It is true that SKAdNetwork cannot be tested in a real way in test or pre-production environments (Testflight) but the EMMA SDK can give us clues of its correct implementation in these environments. To make sure that this functionality is well integrated, follow these steps:
- Launch the app in a sandbox with EMMA SDK 4.12.0 or higher.
- Make sure that, after executing the
startSessionmethod in theAppDelegate, you see the following log:EMMALogger: 4 - Registering app for SKAdNetwork. - After this log you will see the result of the SKAdNetwork log:
SKAdNetwork: Error while updating conversion value: Error Domain=SKANErrorDomain Code=10 "(null)". This error is normal in test environments as the SKAdNetwork does not work, but it gives us a clue that the integration is correct and that theStoreKit.frameworkis working. Any other error or log that the SKAdNetwork API is not available is a symptom of an integration problem withStoreKit.framework.
¶ Powlink integration
¶ Dependencies
-
Set up sub-domain for powlink.
Powlink for iOS uses Apple's Universal Links technology. In order to have direct application openings via universal links, we will need to set up a unique domain or subdomain. See the Powlink configuration support guide on the EMMA dashboard.
-
Add Universal Links support to your application.
See the Apple guide to add Universal Links to the application.
¶ Integrating EMMA Handle Link
For the correct operation of the powlink, EMMA must know all the links that are opened in the application externally, either from an external URL, or from a deeplink implemented in the application.
To do this you must implement the method application(_:continue:restorationHandler:) in your AppDelegate and execute the method EMMA.handleLink(url: URL).
By processing the paths of the received Powlinks you will be able to launch different parts of your application.
Example of implementation of the EMMA.handleLink(url: URL) method:
   func application(_ application: UIApplication, continue userActivity: NSUserActivity, restorationHandler: @escaping ([UIUserActivityRestoring]?) -> Void) -> Bool {
        if userActivity.activityType == NSUserActivityTypeBrowsingWeb {
            if let url = userActivity.webpageURL {
                EMMA.handleLink(url: url)
            }
        }
        return true
   }
- (BOOL)application:(UIApplication *)application continueUserActivity:(NSUserActivity *)userActivity restorationHandler:(void (^)(NSArray<id<UIUserActivityRestoring>> * _Nullable))restorationHandler {
    if (userActivity.activityType == NSUserActivityTypeBrowsingWeb) {
        [EMMALegacy handleLink:userActivity.webpageURL];
    }
    return YES;
}
¶ Powlink with its own domain
If you are using a tracker with a domain other than EMMA's (.powlink.io or .pwlnk.io), it is necessary to add the domain when starting the library so that this domain is recognized as a domain capable of attributing campaigns.
        /*
         You can configure custom powlink domains. It can be full domains,
         or short link domains
         EMMA will treat this domains as their own
         */
        configuration.customPowlinkDomains = ["mycustomdomain.com"]
        configuration.shortPowlinkDomains = ["pow.link"]
¶ Example content for associated domains
- applinks:mysubdomain.powlink.io
- applinks:shortsubdomain.pwlnk.io

¶ Behavior Integration
With EMMA you can perform a complete SDK integration that allows you to know the location of your users, how they register in your App, how many transactions they perform and even their own characteristics. That is, all the information about your users that you will get in the Behavior section.
¶ Event measurement
The EMMA platform differentiates between two types of events. Those that the platform includes by default and the Custom events that you want to integrate according to the structure of your application.
¶ Default events
You can find more information about default events here.
Follow the next steps to integrate them:
¶ Sign Up/Registers/Leads.
The method EMMA.registerUser(userId:forMail:andExtras:) allows to send information about the registrations in the application.
Example:
  func register() {
    EMMA.registerUser("554234", forMail: "test@emma.io")
  }
- (void) registerUser {
    [EMMALegacy registerUser:@"554234" forMail:@"test@emma.io"];
}
¶ Login
The method EMMA.loginUser(userId:forMail:andExtras:) allows to send information about login events.
If we have a successive login event with the same data, we can use the method EMMA.loginDefault(). This method would be useful in the case of an "Auto-Login", for example.
func login() {
    EMMA.loginUser("554234", forMail: "test@emma.io")
}
- (void) registerUser {
    [EMMALegacy loginUser:@"554234" forMail:@"test@emma.io"];
}
¶ Measure transactions
EMMA allows you to measure any transaction or purchase made in your app in a single call using the trackPurchase method.
let request = EMMAPurchaseRequest(
    id: "12345",
    totalPrice: 69.97,
    products: [
        EMMAProduct(id: "001", name: "Jeans", price: 29.99, qty: 1),
        EMMAProduct(id: "002", name: "T-Shirt", price: 19.99, qty: 2)
    ]
)

EMMA.trackPurchase(request: request)
NSArray *products = @[
     [[EMMAProduct alloc] initWithId:@"001" name:@"Jeans" price:29.99 qty:1 extras:nil],
     [[EMMAProduct alloc] initWithId:@"002" name:@"T-Shirt" price:19.99 qty:2 extras:nil]
 ];

 EMMAPurchaseRequest *request = [[EMMAPurchaseRequest alloc] initWithId:@"12345"
                                                                 totalPrice:69.97
                                                                 products:products
                                                                 customerId:nil
                                                                 coupon:nil
                                                                 extras:nil];

[EMMALegacy trackPurchase:request];
EMMAPurchaseRequest parameters:
id(String, required): unique identifier for the transaction.totalPrice(Float, required): total purchase price (must match the sum of the products).products([EMMAProduct], required): list of products included in the purchase (cannot be empty).customerId(String, optional): identifier of the user making the purchase. This is optional as it is taken from methods such assetCustomerId, for example.coupon(String, optional): coupon code applied to the purchase.extras([String: String], optional): additional tags associated with the transaction.
EMMAProduct parameters:
id(String, required): unique product identifier.name(String, required): product name.price(Float, required): unit price of the product.qty(Float, required): quantity purchased of the product.extras([String: String], optional): additional product information.
The
trackPurchasemethod replaces the deprecatedstartOrder,addProductandtrackOrdermethods. We recommend migrating to the newtrackPurchasemethod for simpler and more robust transaction tracking.
// DEPRECATED
func trackTransaction() {
    // Method for initiating the transaction
    EMMA.startOrder("<ORDER_ID>", customerId: "<CUSTOMER_ID>", totalPrice: 10.0, coupon: "")
    // Once the transaction has been initiated, the products must be added to it
    EMMA.addProduct("<PRODUCT_ID>", name: "<PRODUCT_NAME>", qty: 1.0, price: 10.0)
    // Once we have added all the products, we execute the transaction measurement
    EMMA.trackOrder()
}
// DEPRECATED
- (void) trackTransaction {
    // Method for initiating the transaction
    [EMMALegacy startOrder:@"<ORDER_ID>" customerId:@"<CUSTOMER_ID>" totalPrice:10.0 coupon:@""];
    // Once the transaction has been initiated, the products must be added to it
    [EMMALegacy addProduct:@"<PRODUCT_ID>"name:@"<PRODUCT_NAME>" qty:1.0 price:10.0];
    // Once we have added all the products, we execute the transaction measurement
    [EMMALegacy trackOrder];
}
¶ Customized events
Use EMMA.trackEvent(request:) to count the number of times certain events occur during a session in your app.
This can be useful to measure how many times users convert on different actions, for example.
You can obtain event tokens by creating them on the EMMA platform. If a non-existing token is sent to EMMA, an error will be returned.
More general information on customized events can be found in the main documentation.
To send an event specific to your application, you can use the EMMAEventRequest class. It allows you to set an identifier, add custom attributes and define a listener to control the status of the request and check if it returns data (e.g. a rule) or not.
¶ Basic example
let eventRequest = EMMAEventRequest.init(token: "<token>")
EMMA.trackEvent(request: eventRequest)
EMMAEventRequest * request = [[EMMAEventRequest alloc] initWithToken:@"<token>"];
[EMMALegacy trackEvent:request];
¶ Advanced example with identifier, attributes and delegate
class EventExample: NSObject, EMMARequestDelegate {

    func sendAdvancedEvent() {
        let eventRequest = EMMAEventRequest.init(token: "<token>")
        // Optional: You can add your custom event attributes
        eventRequest?.attributes = ["test_attribute":"test_value"]
        // Optional. You can capture emma requests with this delegate
        eventRequest?.requestDelegate = self
        // Optional. Append your request ID to capture it later
        eventRequest?.customId = "MY_EVENT_REQUEST"

        EMMA.trackEvent(eventRequest)
    }

    /****** EMMARequestDelegate Protocol ********/
    func onStarted(_ id: String!) {
        if id == "MY_EVENT_REQUEST" {
            print("Request for MY_EVENT_REQUEST started")
        }
    }

    func onSuccess(_ id: String!, containsData data: Bool) {
        if id == "MY_EVENT_REQUEST" {
            print("Request for MY_EVENT_REQUEST succeed")
        }
    }

    func onFailed(_ id: String!) {
        if id == "MY_EVENT_REQUEST" {
            print("Request for MY_EVENT_REQUEST failed")
        }
    }
}
// ViewController.h
#import <UIKit/UIKit.h>
#import "EMMA_iOS/EMMA_iOS.h"

@interface ViewController : UIViewController<EMMARequestDelegate>
@end

// ViewController.m
#import "ViewController.h"

@interface ViewController ()

@end

@implementation ViewController

- (void)viewDidLoad {
    [super viewDidLoad];
    // Do any additional setup after loading the view.
}

- (void) sendAdvancedEvent {
    EMMAEventRequest * request = [[EMMAEventRequest alloc] initWithToken:@"<token>"];
    // Optional: You can add your custom event attributes
    request.attributes = @{@"test_attribute": @"test_value"};
    // Optional. You can capture emma requests with this delegate
    request.requestDelegate = self;
    // Optional. Append your request ID to capture it later
    request.customId = @"MY_EVENT_REQUEST";

    [EMMALegacy trackEvent:request];
}

- (void)onFailed:(NSString *)requestId {
    if ([requestId isEqualToString:@"MY_EVENT_REQUEST"]) {
        NSLog(@"Request for MY_EVENT_REQUEST failed");
    }
}

- (void)onStarted:(NSString *)requestId {
    if ([requestId isEqualToString:@"MY_EVENT_REQUEST"]) {
        NSLog(@"Request for MY_EVENT_REQUEST started");
    }
}

- (void)onSuccess:(NSString *)requestId containsData:(BOOL)data {
    if ([requestId isEqualToString:@"MY_EVENT_REQUEST"]) {
        NSLog(@"Request for MY_EVENT_REQUEST success");
    }
}

@end
¶ User properties (TAGS)
The method EMMA.trackUserTags(tags:) updates or adds extra parameters in order to get better segmentation in the Users with tag filtering. It can be used in the registration, login or any other section of the app where user information is collected.
If you want to use the EMMA RULE
On his Birthday, send the birthday date with the method for the TAG in the following format (ISO):
Name:BIRTHDAYValue:YYYYYY-MM-DD
Remember to check the SDK logs for the list of TAGS that cannot be used because they are reserved for the EMMA system.
let tags = [“AGE”: “40”, “BIRTHDAY”: “1985-05-17”]
EMMA.trackUserTags(tags: tags)
NSDictionary *tags = @{ @"AGE" : @"40", @"BIRTHDAY" : @"1985-05-17" };
[EMMA trackUserTags: tags];
This method replaces the deprecated
trackExtraUserInfomethod, which will continue to function but it is recommended to migrate totrackUserTags.
// DEPRECATED
func trackUserInfo() {
    EMMA.trackExtraUserInfo(["AGE" : "40"])
}
// DEPRECATED
-(void) trackUserInfo {
    [EMMALegacy trackExtraUserInfo:@{@"AGE": @"40"}];
}
¶ User location logging
EMMA can attach the user's current location, if the application has permissions with the EMMA.trackLocation() method.
¶ User information
¶ EMMA identifier
We can retrieve the EMMA user ID with the method EMMA.getUserId(resultBlock:).
This method returns the EMMA ID as a String. This ID is unique for each user and can be used to filter when communications are sent.
    func getUserID() {
        /* This method gets EMMA user id */
        EMMA.getUserId { (user_id) in
            guard let uid = user_id else {
                print("Error getting user id")
                return
            }
            print("Our EMMA USER ID is \(uid)")
        }
    }
-(void) getUserId {
    [EMMALegacy getUserId:^(NSString *userId) {
        if  (userId) {
            NSLog(@"User id is %@", userId);
        }
    }]
}
¶ Device identifier
The identifier format is UUID V4 type. To obtain the device identifier use the following method:
EMMA.deviceId()
[EMMALegacy deviceId];
¶ Customer user identifier (Customer ID)
To send the customer ID independently of the login/registration use the following method:
EMMA.setCustomerId(customerId: "<Customer ID>")
[EMMALegacy setCustomerId:@"<Customer ID>"];
¶ Link user email
Allows you to associate an email address with the user's device.
EMMA.setEmail(email: "<email>")
[EMMALegacy setEmail:@"<email>"];
¶ Set up complete user profile
Allows you to configure the user profile completely, including customer ID, email (optional) and custom tags (optional) in a single call.
let tags: [String: String] = [
    "age": "25",
    "gender": "female",
    "city": "Madrid"
]

EMMA.setUserProfile(customerId: "user_12345", email: "user@example.com", tags: tags)
NSDictionary *tags = @{
    @"age": @"25",
    @"gender": @"female",
    @"city": @"Madrid"
};

[EMMA setUserProfile:@"user_12345" email:@"user@example.com" tags:tags];
¶ User language configuration
Manually sets the user's preferred language.
This method allows overwriting the default language of the device to set a custom language to be used in all SDK requests. This is useful in applications that allow the user to select a different language than the one configured on the device.
The language code in ISO 639-1 format must be used: es (Spanish), en (English), fr (French), de (German), it (Italian), zh-Hans (Simplified Chinese), zh-Hant (Traditional Chinese), etc.
        // In this case, it establishes English as the language
    EMMA.setUserLanguage("en")
    // In this case, it establishes English as the language
    [EMMALegacy setUserLanguage:@"en"];
If this method is not called, EMMA will default to the user's preferred language configured in the device system.
¶ Get User Info
The method EMMA.getUserInfo(resultBlock:) retrieves the profile of the user we have registered in EMMA.
The data returned by the call is obtained from the information collected by the SDK itself. On a first start it may take a few seconds to collect the information, if the call is made just after the
startSessionit may return nil.
User profile fields reference.
    func getUserInfo() {
        /* This method retrieves a json representation
            of emma's user profile */
        EMMA.getUserInfo { (user_profile) in
            guard let profile = user_profile else {
                print("Error getting user profile")
                return
            }
            print("Retrieved user profile \(profile)")
        }
    }
-(void) getUserInfo {
    [EMMALegacy getUserInfo:^(NSDictionary *userInfo) {
        if (userInfo) {
            NSLog(@"Retrieved user profile %@", userInfo);
        }
    }]
}
¶ Installation attribution information
Through the method EMMA.installAttributionInfo(attributionDelegate:) we will be able to get the installation attribution data for each user.
See the description of attribution fields for the available information.
As of version 4.6.2 the campaign receives the click parameters through the clickParams method.
In order to get information about the attribution of the installation, the following example can be followed:
import UIKit
import EMMA_iOS

class AttributionInfoExampleViewController: UIViewController, EMMAInstallAttributionDelegate {

    override func viewDidLoad() {
        super.viewDidLoad()
        //We can get EMMA Attribution Info
        EMMA.installAttributionInfo(self)
    }

    // MARK: - EMMA Attribution Delegate
    func onAttributionReceived(_ attribution: EMMAInstallAttribution!) {
        guard let info = attribution else {
            print("Error getting attribution info")
            return
        }
        print("Received attribution info \(info)")
    }
}
// AttributionInfoExampleViewController.h
#import <UIKit/UIKit.h>
#import "EMMA_iOS/EMMA_iOS.h"

@interface AttributionInfoExampleViewController : UIViewController<EMMAInstallAttributionDelegate>

@end

// AttributionInfoExampleViewController.m
#import "AttributionInfoExampleViewController.h"

@interface AttributionInfoExampleViewController ()

@end

@implementation AttributionInfoExampleViewController

- (void)viewDidLoad {
    [super viewDidLoad];
    // Do any additional setup after loading the view.
    [EMMALegacy installAttributionInfo:self];
}


- (void)onAttributionReceived:(EMMAInstallAttribution *)attribution {
    if (attribution) {
        NSLog(@"Received attribution info %@", attribution);
    }
}

@end
¶ Push Notifications Integration
To differentiate a notification from our push system with respect to other systems, the payload sent by EMMA contains a flag called "eMMa".
EMMA allows you to add a powerful Push Notification system that is easy to integrate. The platform also allows you to send info through notifications and generate any action within your app thanks to them.
¶ Push Auth Key
The Apple APNs Auth Key is a type of certificate (.p8) that replaces its predecessors: the production APNs certificate and the development APNs certificate. EMMA recommends the use of this certificate for the following reasons:
- It unifies the development and production certificate in a single certificate.
- It is a certificate that does not have to be renewed every year.
- A single certificate serves for all the apps in the Apple account.
To use this certificate it is necessary:
- The .p8 certificate downloaded from the Apple Developers panel.
- The bundle ID of the application that is to receive the Push.
- The team ID of the Apple account.
How to obtain the Push Auth Key in Apple.
¶ Using EMMA Push Notifications
Once you have generated the certificates for your app, you can start integrating Push Notifications. Below is an example of an AppDelegate complete with push integration:
class AppDelegate: UIResponder, UIApplicationDelegate, UNUserNotificationCenterDelegate, EMMAPushDelegate {
  func application(_ application: UIApplication, didFinishLaunchingWithOptions launchOptions: [UIApplication.LaunchOptionsKey: Any]?) -> Bool {
 				...
      //Enable EMMA Push System
      EMMA.startPushSystem()
      EMMA.setPushSystemDelegate(self)
  }

  func application(_ application: UIApplication, didRegisterForRemoteNotificationsWithDeviceToken deviceToken: Data) {
      EMMA.registerToken(deviceToken)
    }

    @available(iOS 10.0, *)
    func userNotificationCenter(_ center: UNUserNotificationCenter,  willPresent notification: UNNotification, withCompletionHandler   completionHandler: @escaping (_ options:   UNNotificationPresentationOptions) -> Void) {
      if #available(iOS 14.0, *) {
          completionHandler([.badge, .sound, .banner, .list])
      } else {
          completionHandler([.badge, .sound, .alert])
      }
  }

  @available(iOS 10.0, *)
  func userNotificationCenter(_ center: UNUserNotificationCenter, didReceive response: UNNotificationResponse, withCompletionHandler completionHandler: @escaping () -> Void) {
      EMMA.handlePush(response.notification.request.content.userInfo)
      completionHandler()
    }
}
// AppDelegate.h
#import <UIKit/UIKit.h>
#import "EMMA_iOS/EMMA_iOS.h"

@interface AppDelegate : UIResponder <UNUserNotificationCenterDelegate, EMMAPushDelegate>
@end

// AppDelegate.m
#import <UIKit/UIKit.h>
#import "EMMA_iOS/EMMA_iOS.h"

@interface AppDelegate : UIResponder <UNUserNotificationCenterDelegate, EMMAPushDelegate>

- (BOOL)application:(UIApplication *)application didFinishLaunchingWithOptions:(NSDictionary *)launchOptions {
    EMMAConfiguration *configuration = [EMMAConfiguration new];
    configuration.sessionKey = @"MY_EMMA_SESSION_KEY";
    configuration.debugEnabled = true;
    configuration.trackScreenEvents = false; // disable screens
    configuration.pushNotificationsDelegate = self;

    [EMMALegacy startSessionWithConfiguration:configuration];
    [EMMALegacy startPushSystem];

    return YES;
}

- (void)application:(UIApplication *)application didRegisterForRemoteNotificationsWithDeviceToken:(NSData *)deviceToken{
    [EMMALegacy registerToken:deviceToken];
}

- (void)userNotificationCenter:(UNUserNotificationCenter *)center
       willPresentNotification:(UNNotification *)notification
         withCompletionHandler:(void (^)(UNNotificationPresentationOptions options))completionHandler {
    if (@available(iOS 14, *)) {
        completionHandler(UNNotificationPresentationOptionBadge | UNNotificationPresentationOptionSound | UNNotificationPresentationOptionList | UNNotificationPresentationOptionBanner);
    } else {
        completionHandler(UNNotificationPresentationOptionBadge | UNNotificationPresentationOptionSound | UNNotificationPresentationOptionAlert);
    }
}

-(void) userNotificationCenter:(UNUserNotificationCenter *)center didReceiveNotificationResponse:(UNNotificationResponse *)response withCompletionHandler:(void (^)(void))completionHandler {
    [EMMALegacy handlePush:response.notification.request.content.userInfo];
    completionHandler();
}
@end

- (void)onPushOpen:(EMMAPush *)push {
    if (push) {
    	NSLog(@"Obtained push campaign %@", push);
    }
}
To maintain the badge values between the extension and the application, it is necessary to add a new AppGroup to the app's Capabilities with the following format: group.YOUR_BUNDLE_ID.emma
Optionally, if you want to control what is received from a Push, your AppDelegate can implement the EMMAPushDelegate delegate and the onPushOpen method that will be called when the user opens the notification.
@UIApplicationMain
class AppDelegate: UIResponder, UIApplicationDelegate, EMMAPushDelegate, UNUserNotificationCenterDelegate {
        func application(_ application: UIApplication, didFinishLaunchingWithOptions launchOptions: [UIApplication.LaunchOptionsKey: Any]?) -> Bool {
      // ...
      configuration.pushDelegate = self
      // ...
  }

   func onPushOpen(_ push: EMMAPush) {
   		// Do whatever you want with push
   }
}
Unregister push notifications
To disable notifications on a device, use EMMA.unregisterPushSystem() and ensure that you do not call EMMA.startPushSystem() again.
¶ Enable Push Capabilities
To register the token it is necessary to activate Push Notifications in Capabilities.

¶ Reset Badge
To reset the badge that counts the number of notifications received, there are two ways:
- If you are not using the extension, simply using the method provided by Apple is sufficient:
UIApplication.sharedApplication().applicationIconBadgeNumber = 0
[UIApplication sharedApplication].applicationIconBadgeNumber = 0
- If you use the extension, the value of the badge is stored and increased when receiving notifications, to reset it:
// Clear with push system start
 let options = EMMAPushOptions()
 options.badgeClearing = true
 EMMA.startPushSystem(with: options)

// Clear anywhere in the app
 EMMAPushBadgeController.clearBadge(fromOpen: true)
// Clear with push system start
  EMMAPushOptions * pushOptions = [EMMAPushOptions new];
  pushOptions.badgeClearing = true
  [EMMALegacy startPushSystemWithOptions:pushOptions];

// Clear anywhere in the app
  [EMMAPushBadgeController clearBadgeFromOpen:true];
The badge is saved in the user's preferences. To synchronize these preferences between the app and the extension, it is necessary to configure an AppGroup in "Capabilities", both in the target of the App and in the extension. The format of the bundle must be "group.{bundleId}.emma", where bundleId is the Bundle ID of the target App.
![]()
¶ Rich Push
Rich Push Notifications are enabled via a Notification Service Extension, a separate binary within your application package. Before displaying a new push notification, the system will call your Notification Service Extension allowing you to modify the content and attachments that will be displayed.
¶ Creating the Notification Service Extension
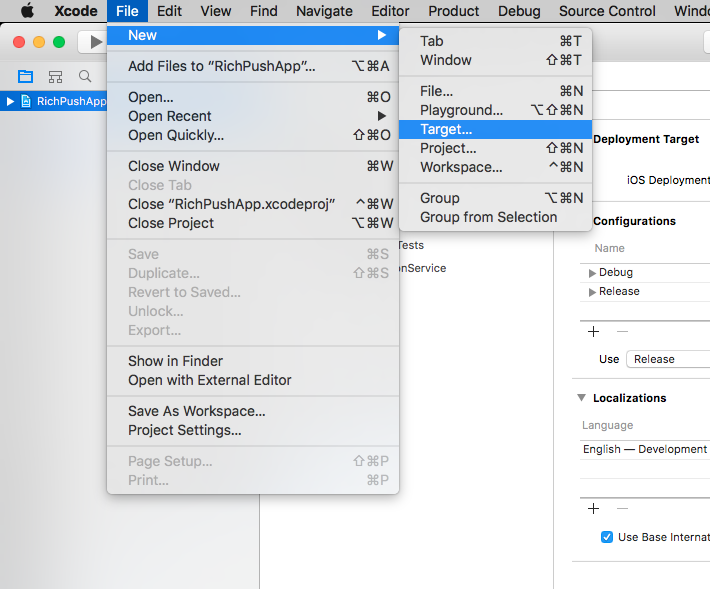
To create the Notification Service Extension in your project, in Xcode choose File -> New -> Target and choose the Notification Service Extension template.
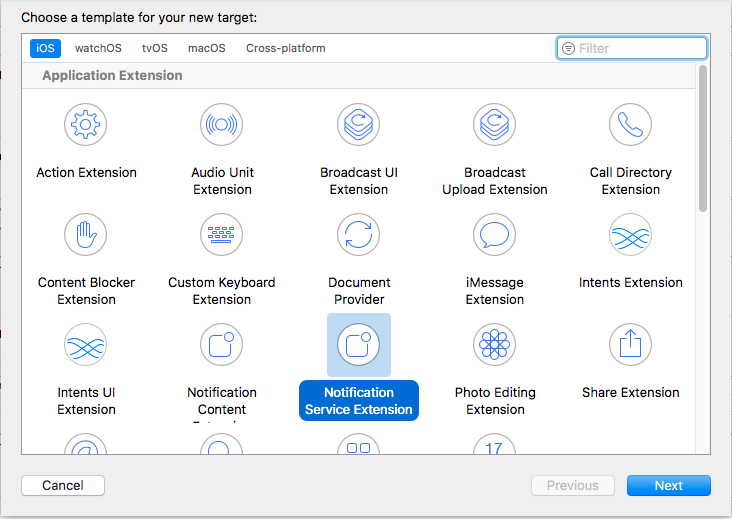
You can name the extension as you like, we will call it RichPushExtension for this guide. Be sure to include the extension in your application.
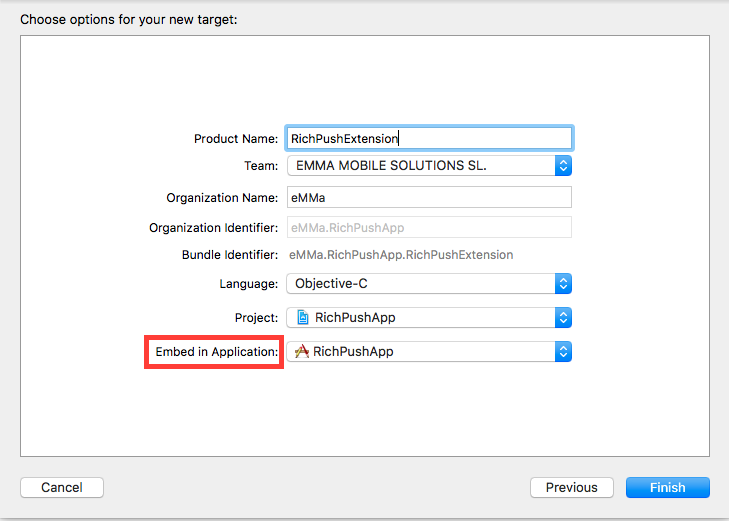
When you click Finish you will be asked to activate the extension, click Activate to finish.

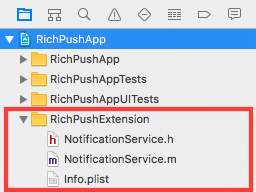
At the end of these steps, three new files have been added to the directory with the name of the extension we have created (RichPushExtension in our case): NotificationService.h, NotificationService.m and Info.plist.
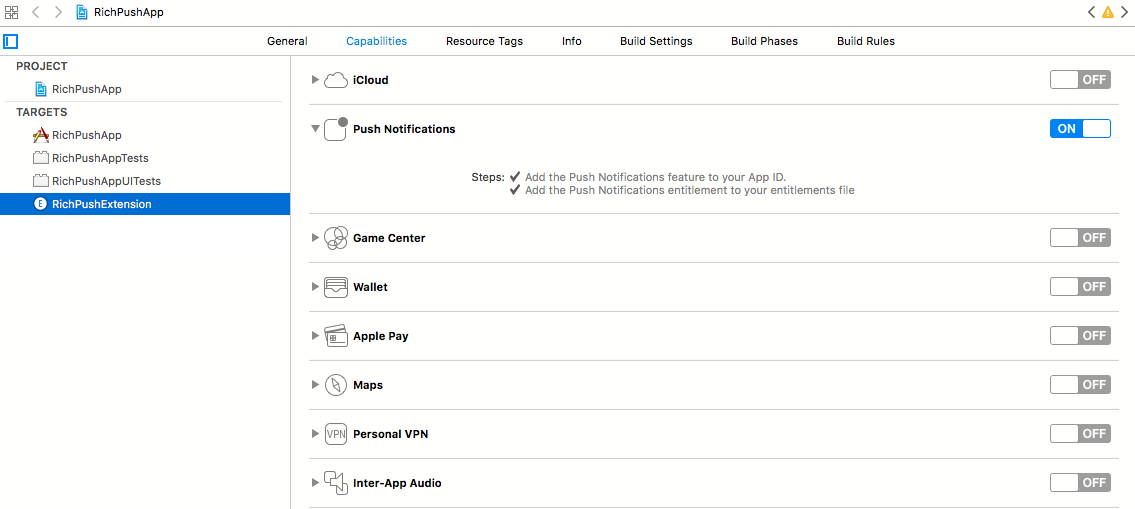
Finally make sure that push notifications are enabled for the extension we have created. Select your new extension (RichPushExtension), choose Capabilities and enable Push Notifications.
¶ NotificationService
import UIKit
import UserNotifications
import EMMA_iOS

class NotificationService: UNNotificationServiceExtension {

    var contentHandler: ((UNNotificationContent) -> Void)?
    var bestAttemptContent: UNMutableNotificationContent?

    override func didReceive(_ request: UNNotificationRequest, withContentHandler contentHandler: @escaping (UNNotificationContent) -> Void) {
        self.contentHandler = contentHandler
        bestAttemptContent = (request.content.mutableCopy() as? UNMutableNotificationContent)

        if let bestAttemptContent = bestAttemptContent {
            EMMA.didReceiveNotificationRequest(request: request, withNotificationContent: bestAttemptContent) { (content) in
                contentHandler(bestAttemptContent)
            }
        }
    }

    override func serviceExtensionTimeWillExpire() {
        if let contentHandler = contentHandler, let bestAttemptContent =  bestAttemptContent {
            contentHandler(bestAttemptContent)
        }
    }
}
#import "NotificationService.h"
#import "EMMA_iOS/EMMA_iOS.h"

@interface NotificationService ()

@property (nonatomic, strong) void (^contentHandler)(UNNotificationContent *contentToDeliver);
@property (nonatomic, strong) UNMutableNotificationContent *bestAttemptContent;

@end

@implementation NotificationService

- (void)didReceiveNotificationRequest:(UNNotificationRequest *)request withContentHandler:(void (^)(UNNotificationContent * _Nonnull))contentHandler {
    self.contentHandler = contentHandler;
    self.bestAttemptContent = [request.content mutableCopy];

    [EMMALegacy didReceiveNotificationRequest:request withNotificationContent:_bestAttemptContent AndCompletionHandler:^(UNNotificationContent *) {
        contentHandler(self.bestAttemptContent);
    }];
}

- (void)serviceExtensionTimeWillExpire {
    // Called just before the extension will be terminated by the system.
    // Use this as an opportunity to deliver your "best attempt" at modified content, otherwise the original push payload will be used.
    self.contentHandler(self.bestAttemptContent);
}

@end
The EMMA.didReceiveNotificationRequest method automatically processes EMMA push notifications to add rich content (title, message, images and GIFs, action buttons, etc.) already configured in EMMA.
Once we have the NotificationService, no additional code is needed. The EMMA SDK automatically handles the download and display of content in your push notifications.
¶ Add dependency to the extension Pod
To add the SDK to the extension it is necessary to modify the Podfile file by adding the eMMa pod to the extension target:
target 'ProjectName' do
  pod 'eMMa', '~> 4.15.5'
end

target 'EMMANotificationServiceExtension' do
  pod 'eMMa', '~> 4.15.5'
end
¶ Rich Push, custom sounds
To use custom sounds in the notifications you send with EMMA, you have to add the .caf sound files you want to your application, in the root of your application package or in Library/Sounds/. Remember to use the same file names for the sounds on iOS and Android.
¶ Rich Push, open URL's and deeplinks
You can redirect push notification opens to a section in your app. To do this you should use a structure like this:
scheme://host/page1/page2/page3
¶ Buttons with actions
On SDK version 4.10.x, functionality of buttons with actions in notifications has been added. In order to track the action from which the notification is opened, we must replace the handlePush that we are using so far with this one:
    @available(iOS 10.0, *)
    func userNotificationCenter(_ center: UNUserNotificationCenter, didReceive response: UNNotificationResponse, withCompletionHandler completionHandler: @escaping () -> Void) {
        EMMA.handlePush(userInfo: response.notification.request.content.userInfo,
                        actionIdentifier: response.actionIdentifier
        )
        completionHandler()
    }
-(void) userNotificationCenter:(UNUserNotificationCenter *)center didReceiveNotificationResponse:(UNNotificationResponse *)response withCompletionHandler:(void (^)(void))completionHandler {
    [EMMALegacy handlePush:response.notification.request.content.userInfo withActionIdentifier:response.actionIdentifier];
    completionHandler();
}
To ensure correct operation, check that the SDK that contains the notification service has version 4.10.x and is aligned with the version of the app.
See here to configure a push with these actions.
¶ In-App Messaging Integration
EMMA includes 8 different communication formats that you can integrate to impact your users on iOS:
- NativeAd - Format that integrates your communications always respecting the format and style of the contents of the App.
- StartView - Format that displays on the entire screen showing web content.
- AdBall - Communicative format in the form of a bubble, whose click triggers the display of web content.
- Banner - Basic format for your communications that you can use to communicate specific messages both above and below the screen.
- Strip - Communicative format that occupies the device's notification bar and displays a message from right to left.
- Coupon - Format that gives you the option to redeem coupons if you have a physical location by controlling the number of redemptions, the promotional code and the activation and end date.
- DynamicTab - Communicative format that is included as a new tab within your TabBar. Only available for iOS.
- Custom plugins - Own communication format through NativeAd technology.
¶ NativeAd
¶ What is a NativeAd?
EMMA's NativeAds allow you to integrate personalised advertising that adapts to the design of your application. Unlike other formats (StartView, AdBall, etc.), you have complete control over how the content is displayed. EMMA provides the data (title, image, CTA, etc.) configured in the EMMA dashboard, and your app decides how to display it.
¶ Preconfiguration
Before requesting a NativeAd, you must:
- Create a template in the EMMA dashboard.
- Define the fields it will contain (title, image, description, CTA, etc.).
- Assign a unique identifier to the template.
For more details on how to configure a NativeAd in the dashboard, please refer to our main documentation.
¶ Get NativeAds
¶ Implement the EMMAInAppMessageDelegate protocol
Depending on whether you want to obtain a single NativeAd or multiple ones:
// To obtain a single NativeAd or multiple NativeAds
class MyViewController: UIViewController, EMMAInAppMessageDelegate {
    // ...
}
// To obtain a single NativeAd or multiple NativeAds
@interface MyViewController : UIViewController<EMMAInAppMessageDelegate>
@end
| Protocol method | Use |
|---|---|
onReceived |
Get the latest NativeAd from a template |
onBatchNativeAdReceived |
Get all active NativeAds from a template |
¶ Request a unique NativeAd
class MyViewController: UIViewController, EMMAInAppMessageDelegate {

    override func viewDidLoad() {
        super.viewDidLoad()
        requestNativeAd()
    }

    func requestNativeAd() {
        let request = EMMANativeAdRequest()
        request.templateId = "templateId"
        EMMA.inAppMessage(request: request, withDelegate: self)
    }

    func onReceived(_ nativeAd: EMMANativeAd!) {
        // Process and display the NativeAd
        displayNativeAd(nativeAd)
    }

    func onShown(_ campaign: EMMACampaign!) {
        // Optional: when the NativeAd is displayed
    }

    func onHide(_ campaign: EMMACampaign!) {
        // Optional: when the NativeAd is hidden
    }

    func onClose(_ campaign: EMMACampaign!) {
        // Optional: when the NativeAd closes
    }
}
// MyViewController.h
#import <UIKit/UIKit.h>
#import "EMMA_iOS/EMMA_iOS.h"

@interface MyViewController : UIViewController<EMMAInAppMessageDelegate>
@end

// MyViewController.m
@implementation MyViewController

- (void)viewDidLoad {
    [super viewDidLoad];
    [self requestNativeAd];
}

- (void)requestNativeAd {
    EMMANativeAdRequest *request = [EMMANativeAdRequest new];
    request.templateId = @"templateId";
    [EMMALegacy inAppMessage:request withDelegate:self];
}

- (void)onReceived:(EMMANativeAd *)nativeAd {
    // Process and display the NativeAd
    [self displayNativeAd:nativeAd];
}

- (void)onShown:(EMMACampaign *)campaign {
    // Optional: when the NativeAd is displayed
}

- (void)onHide:(EMMACampaign *)campaign {
    // Optional: when the NativeAd is hidden
}

- (void)onClose:(EMMACampaign *)campaign {
    // Optional: when the NativeAd closes
}

@end
¶ Request multiple NativeAds (batch)
class MyViewController: UIViewController, EMMAInAppMessageDelegate {

    func requestBatchNativeAds() {
        let request = EMMANativeAdRequest()
        request.templateId = "templateId"
        request.isBatch = true
        EMMA.inAppMessage(request: request, withDelegate: self)
    }

    func onBatchNativeAdReceived(_ nativeAds: [EMMANativeAd]!) {
        // Process the NativeAds list
        nativeAds.forEach { nativeAd in
            displayNativeAd(nativeAd)
        }
    }

    // Methods onShown, onHide, onClose...
}
- (void)requestBatchNativeAds {
    EMMANativeAdRequest *request = [EMMANativeAdRequest new];
    request.templateId = @"templateId";
    request.isBatch = YES;
    [EMMALegacy inAppMessage:request withDelegate:self];
}

- (void)onBatchNativeAdReceived:(NSArray<EMMANativeAd *> *)nativeAds {
    // Process the NativeAds list
    for (EMMANativeAd *nativeAd in nativeAds) {
        [self displayNativeAd:nativeAd];
    }
}

// Methods onShown, onHide, onClose...
¶ Working with data
¶ Access content
func displayNativeAd(_ nativeAd: EMMANativeAd) {
    guard let content = nativeAd.nativeAdContent as? [String: Any] else {
        return
    }

    // Get fields by name (configured in the dashboard)
    let title = content["Title"] as? String
    let imageUrl = content["Main picture"] as? String
    let ctaText = content["CTA"] as? String

    // Validate that the necessary fields exist
    if let title = title, let imageUrl = imageUrl {
        // Update your UI with this data
        titleLabel.text = title
        // Upload image

        // Important: send impression when displayed
        EMMA.sendImpression(.campaignNativeAd, withId: String(nativeAd.idPromo))
    }
}
- (void)displayNativeAd:(EMMANativeAd *)nativeAd {
    NSDictionary *content = nativeAd.nativeAdContent;

    // Get fields by name (configured in the dashboard)
    NSString *title = content[@"Title"];
    NSString *imageUrl = content[@"Main picture"];
    NSString *ctaText = content[@"CTA"];

    // Validate that the necessary fields exist
    if (title && imageUrl) {
        // Update your UI with this data
        self.titleLabel.text = title;
        // Upload image

        // Important: send impression when displayed
        [EMMALegacy sendImpression:kCampaignNativeAd
                            withId:[@(nativeAd.idPromo) stringValue]];
    }
}
¶ Working with containers
Containers allow you to group multiple elements together, which is useful for carousels or product lists:
func displayContainerNativeAd(_ nativeAd: EMMANativeAd) {
    let content = nativeAd.nativeAdContent

    if let container = content?["container"] as? [[String: Any]] {
        // Iterate over the elements of the container
        container.forEach { containerFields in
            let title = containerFields["Title"] as? String
            let image = containerFields["Main picture"] as? String
            let cta = containerFields["CTA"] as? String

            // Create UI element
            addItemToView(title, image, cta)
        }
    }

    // Track impression
    EMMA.sendImpression(.campaignNativeAd, withId: String(nativeAd.idPromo))
}
- (void)displayContainerNativeAd:(EMMANativeAd *)nativeAd {
    NSDictionary *content = nativeAd.nativeAdContent;

    NSArray *container = content[@"container"];
    if ([container isKindOfClass:[NSArray class]]) {
        // Iterate over the elements of the container
        for (NSDictionary *containerFields in container) {
            NSString *title = containerFields[@"Title"];
            NSString *image = containerFields[@"Main picture"];
            NSString *cta = containerFields[@"CTA"];

            // Create UI element
            [self addItemToView:title image:image cta:cta];
        }
    }

    // Track impression
    [EMMALegacy sendImpression:kCampaignNativeAd
                        withId:[@(nativeAd.idPromo) stringValue]];
}
¶ Useful properties of NativeAd
let templateId = nativeAd.nativeAdTemplateId // Template ID
let tag = nativeAd.tag // Assigned tag
let campaignId = nativeAd.idPromo // Campaign ID
let params = nativeAd.params // Additional parameters
NSString *templateId = nativeAd.nativeAdTemplateId; // Template ID
NSString *tag = nativeAd.tag; // Assigned tag
long campaignId = nativeAd.idPromo; // Campaign ID
NSDictionary *params = nativeAd.params; // Additional parameters
¶ Interactions and tracking
¶ Impression (mandatory)
You should always send an impression when displaying the NativeAd on screen:
EMMA.sendImpression(.campaignNativeAd, withId: String(nativeAd.idPromo))
[EMMALegacy sendImpression:kCampaignNativeAd
                    withId:[@(nativeAd.idPromo) stringValue]];
¶ Click: open NativeAd (recommended)
When the user clicks to open the NativeAd, use openNativeAd:
@objc func nativeAdTapped() {
    EMMA.openNativeAd(campaignId: String(nativeAd.idPromo))
}
- (void)nativeAdTapped {
    [EMMALegacy openNativeAd:[@(nativeAd.idPromo) stringValue]];
}
What does openNativeAd do?
- Open the NativeAd content (CTA configured in the dashboard).
- Automatically send click tracking.
¶ Manual click (alternative)
If you need to control the opening manually:
@objc func nativeAdTapped() {
    // Track the click
    EMMA.sendClick(.campaignNativeAd, withId: String(nativeAd.idPromo))

    // Open your own URL or custom action
    if let urlString = ctaUrl, let url = URL(string: urlString) {
        UIApplication.shared.open(url)
    }
}
- (void)nativeAdTapped {
    // Track the click
    [EMMALegacy sendClick:kCampaignNativeAd
                   withId:[@(self.nativeAd.idPromo) stringValue]];

    // Open your own URL or custom action
    if (self.ctaUrl) {
        NSURL *url = [NSURL URLWithString:self.ctaUrl];
        [[UIApplication sharedApplication] openURL:url
                                           options:@{}
                                 completionHandler:nil];
    }
}
¶ Dismissed click: rejection click
When the user closes or rejects the NativeAd without opening it:
@objc func closeButtonTapped() {
    // Track rejection
    EMMA.sendDismissedClick(.campaignNativeAd, withId: String(nativeAd.idPromo))

    // Remove NativeAd from the UI
    removeNativeAdFromView()
}
- (void)closeButtonTapped {
    // Track rejection
    [EMMALegacy sendDismissedClick:kCampaignNativeAd
                            withId:[@(self.nativeAd.idPromo) stringValue]];

    // Remove NativeAd from the UI
    [self removeNativeAdFromView];
}
When to use sendDismissedClick?
| To use | Do not use |
|---|---|
| Close/delete button | Disappearance due to natural scrolling |
| Swipe to dismiss | Automatic timeout |
| User explicitly rejects | Navigation to another screen |
¶ Complete example
class NativeAdViewController: UIViewController, EMMAInAppMessageDelegate {

    @IBOutlet weak var nativeAdContainer: UIView!
    @IBOutlet weak var titleLabel: UILabel!
    @IBOutlet weak var imageView: UIImageView!
    @IBOutlet weak var closeButton: UIButton!
    @IBOutlet weak var tagLabel: UILabel!

    private var currentNativeAd: EMMANativeAd?

    override func viewDidLoad() {
        super.viewDidLoad()

        nativeAdContainer.isHidden = true

        // Request NativeAd
        let request = EMMANativeAdRequest()
        request.templateId = "templateId"
        EMMA.inAppMessage(request: request, withDelegate: self)
    }

    func onReceived(_ nativeAd: EMMANativeAd!) {
        currentNativeAd = nativeAd
        guard let content = nativeAd.nativeAdContent as? [String: Any] else {
            return
        }

        // Obtain data
        guard let title = content["Title"] as? String else {
            return
        }
        let imageUrl = content["Image"] as? String

        // Display in UI
        titleLabel.text = title
        if let imageUrl = imageUrl, let url = URL(string: imageUrl) {
            imageView.sd_setImage(with: url)
        }

        // Display tag if it exists
        if let tag = nativeAd.tag {
            tagLabel.text = tag
            tagLabel.isHidden = false
        }

        nativeAdContainer.isHidden = false

        // Track impression
        EMMA.sendImpression(.campaignNativeAd, withId: String(nativeAd.idPromo))

        let tapGesture = UITapGestureRecognizer(target: self,
                                                action: #selector(nativeAdTapped))
        nativeAdContainer.addGestureRecognizer(tapGesture)

        closeButton.addTarget(self,
                             action: #selector(closeButtonTapped),
                             for: .touchUpInside)
    }

    @objc func nativeAdTapped() {
        guard let nativeAd = currentNativeAd else { return }
        // Open and track in a single call
        EMMA.openNativeAd(campaignId: String(nativeAd.idPromo))
    }

    @objc func closeButtonTapped() {
        guard let nativeAd = currentNativeAd else { return }
        // Track rejection
        EMMA.sendDismissedClick(.campaignNativeAd, withId: String(nativeAd.idPromo))

        nativeAdContainer.isHidden = true
    }

    func onShown(_ campaign: EMMACampaign!) {}
    func onHide(_ campaign: EMMACampaign!) {}
    func onClose(_ campaign: EMMACampaign!) {}

    override func viewDidDisappear(_ animated: Bool) {
        super.viewDidDisappear(animated)
        // Clear the delegate when exiting
        EMMA.removeInAppDelegate(delegate: self)
    }
}
// NativeAdViewController.h
#import <UIKit/UIKit.h>
#import "EMMA_iOS/EMMA_iOS.h"

@interface NativeAdViewController : UIViewController<EMMAInAppMessageDelegate>
@end

// NativeAdViewController.m
@interface NativeAdViewController ()
@property (weak, nonatomic) IBOutlet UIView *nativeAdContainer;
@property (weak, nonatomic) IBOutlet UILabel *titleLabel;
@property (weak, nonatomic) IBOutlet UIImageView *imageView;
@property (weak, nonatomic) IBOutlet UIButton *closeButton;
@property (weak, nonatomic) IBOutlet UILabel *tagLabel;
@property (strong, nonatomic) EMMANativeAd *currentNativeAd;
@end

@implementation NativeAdViewController

- (void)viewDidLoad {
    [super viewDidLoad];

    self.nativeAdContainer.hidden = YES;

    // Request NativeAd
    EMMANativeAdRequest *request = [EMMANativeAdRequest new];
    request.templateId = @"templateId";
    [EMMALegacy inAppMessage:request withDelegate:self];
}

- (void)onReceived:(EMMANativeAd *)nativeAd {
    self.currentNativeAd = nativeAd;
    NSDictionary *content = nativeAd.nativeAdContent;

    // Obtain data
    NSString *title = content[@"Title"];
    if (!title) {
        return;
    }
    NSString *imageUrl = content[@"Image"];

    // Display in UI
    self.titleLabel.text = title;
    if (imageUrl) {
        NSURL *url = [NSURL URLWithString:imageUrl];
        [self.imageView sd_setImageWithURL:url];
    }

    // Display tag if it exists
    if (nativeAd.tag) {
        self.tagLabel.text = nativeAd.tag;
        self.tagLabel.hidden = NO;
    }

    self.nativeAdContainer.hidden = NO;

    // Track impression
    [EMMALegacy sendImpression:kCampaignNativeAd
                        withId:[@(nativeAd.idPromo) stringValue]];

    UITapGestureRecognizer *tapGesture =
        [[UITapGestureRecognizer alloc] initWithTarget:self
                                                action:@selector(nativeAdTapped)];
    [self.nativeAdContainer addGestureRecognizer:tapGesture];

    [self.closeButton addTarget:self
                         action:@selector(closeButtonTapped)
               forControlEvents:UIControlEventTouchUpInside];
}

- (void)nativeAdTapped {
    if (!self.currentNativeAd) return;
    // Open and track in a single call
    [EMMALegacy openNativeAd:[@(self.currentNativeAd.idPromo) stringValue]];
}

- (void)closeButtonTapped {
    if (!self.currentNativeAd) return;
    // Track rejection
    [EMMALegacy sendDismissedClick:kCampaignNativeAd
                            withId:[@(self.currentNativeAd.idPromo) stringValue]];

    self.nativeAdContainer.hidden = YES;
}

- (void)onShown:(EMMACampaign *)campaign {}
- (void)onHide:(EMMACampaign *)campaign {}
- (void)onClose:(EMMACampaign *)campaign {}

- (void)viewDidDisappear:(BOOL)animated {
    [super viewDidDisappear:animated];
    // Clear the delegate when exiting
    [EMMALegacy removeInAppDelegate:self];
}

@end
¶ Best practices
¶ Do
- Send
sendImpressionwhen the NativeAd is visible on screen. - Use
openNativeAdto open and track in a single call. - Track
sendDismissedClickwhen the user dismisses the NativeAd. - Validate that mandatory fields exist before displaying.
- Handle optional fields with default values.
- Call
removeInAppDelegatewhen you exit the view controller.
¶ Avoid
- Do not track multiple impressions for the same NativeAd.
- Do not call
sendClickandopenNativeAdtogether (duplicate tracking). - Do not use
sendDismissedClickfor automatic dismissals. - Do not display the NativeAd if mandatory fields are missing.
- Do not forget to clean up the delegate to avoid memory leaks.
¶ StartView
EMMA's StartView allows you to display HTML information at the top of your WebView.
To enable the use of StartViews you must integrate:
    func getStartView() {
        let startViewinAppRequest = EMMAInAppRequest(type: .Startview)
        // Optional. You can filter by label
        startViewinAppRequest?.label = "<LABEL>"
        /*
         By default Startview presents on UIApplication.shared.delegate?.window?.rootViewController
         You can customize this behavior uncommenting following line
        */
        //EMMA.setRootViewController(UIViewController!)
        EMMA.inAppMessage(startViewinAppRequest)
    }
-(void) getStartView {
    /* By default Startview presents on UIApplication.shared.delegate?.window?.rootViewController
    You can customize this behavior uncommenting following line */
    //[EMMALegacy setRootViewController:(UIViewController *)]
    EMMAInAppRequest *startViewRequest = [[EMMAInAppRequest alloc] initWithType: Startview];
    [EMMALegacy inAppMessage:startViewRequest];
}
¶ AdBall
EMMA AdBall allows you to display a small pie chart in your application that the user can scroll freely on the home screen of the app and also close it. Clicking on it, displays a pop-up with HTML content.
    func getAdBall() {
        let adballRequest = EMMAInAppRequest(type: .Adball)
        EMMA.inAppMessage(adballRequest)
    }
-(void) getStartView {
    /* By default Startview presents on UIApplication.shared.delegate?.window?.rootViewController
    You can customize this behavior uncommenting following line */
    //[EMMALegacy setRootViewController:(UIViewController *)]
    EMMAInAppRequest *startViewRequest = [[EMMAInAppRequest alloc] initWithType: Startview];
    [EMMALegacy inAppMessage:startViewRequest];
}
¶ Check if the AdBall is being displayed
Use to check if the AdBall is being displayed on the device screen. Returns BOOL true if it is being displayed on the screen.
        //Check if any adball is showing
        if EMMA.isAdBallShowing() {
            print("There is an adball floating arround")
        }
        //Check if any adball is showing
    if ([EMMALegacy isAdBallShowing]) {
        NSLog(@"There is an adball floating arround");
    }
¶ Banner
EMMA Banners allow you to display a banner in your app with customized promotional information. The banner will be displayed depending on the configuration you set in the EMMA dashboard. It is a communication that allows you to show the user an external WebView with HTML content or redirect to another tab of the application (via deeplink).
To display the Banners in your app you need to at least integrate the first method described below:
It is recommended to make the call inside the
viewDidLayoutSubviewsfunction.
    func getBanner() {
        let bannerRequest = EMMAInAppRequest(type: .Banner)
        EMMA.inAppMessage(bannerRequest)
    }
-(void) getBanner {
    EMMAInAppRequest *bannerRequest = [[EMMAInAppRequest alloc] initWithType:Banner];
    [EMMALegacy inAppMessage:bannerRequest];
}
¶ Strip
The EMMA Strip allows you to display a text banner over where the Status Bar is usually placed with a message to your users. This can be displayed on any screen of the app.
    func getStrip() {
        let stripRequest = EMMAInAppRequest(type: .Strip)
        EMMA.inAppMessage(stripRequest)
    }
-(void) getStrip {
    EMMAInAppRequest * stripRequest = [[EMMAInAppRequest alloc] initWithType: Strip];
    [EMMALegacy inAppMessage:stripRequest];
}
¶ Coupon
EMMA Coupons allows you to obtain, verify and redeem coupons that have been defined and configured in the EMMA platform.
A list of the existing coupons will be returned, listing first the automatic coupons ordered from most recent to oldest and then the classic coupons will be listed, also ordered from most recent to oldest.
In the response block, we will obtain a dictionary with the information related to each coupon available to the user. For each coupon the following information is available: id (EMMA internal identifier), code, maximum number of redemptions, number of times redeemed, title, description, image, etc.
¶ Complete Coupons integration example
import UIKit
import EMMA_iOS

class CouponExampleViewController: UIViewController, EMMACouponDelegate {

    override func viewDidLoad() {
        super.viewDidLoad()
        // Add coupon delegate
        EMMA.add(self)
    }

    func getAllCoupons() {
        let couponsRequest = EMMAInAppRequest(type: .Coupons)
        EMMA.inAppMessage(couponsRequest)
    }

    func sentCouponClick(_ coupon: EMMACoupon) {
        EMMA.sendClick(.campaignCoupon, withId: String(coupon.couponId))
    }

    func getSingleCoupon() {
        let couponsRequest = EMMAInAppRequest(type: .Coupons)
        couponsRequest?.inAppMessageId = "<COUPON_ID>"
        EMMA.inAppMessage(couponsRequest)
    }

    func checkCouponRedeems() {
        let couponsRequest = EMMAInAppRequest(type: .CouponValidRedeems)
        // You must pass coupon id to check
        couponsRequest?.inAppMessageId = "<COUPON_ID>"
        EMMA.inAppMessage(couponsRequest)
    }

    func redeemCoupon() {
        let redeemCouponRequest = EMMAInAppRequest(type: .RedeemCoupon)
        redeemCouponRequest?.inAppMessageId = "<COUPON_ID>"
        EMMA.inAppMessage(redeemCouponRequest)
    }

    func cancelCoupon() {
        let cancelCouponRequest = EMMAInAppRequest(type: .CancelCoupon)
        cancelCouponRequest?.inAppMessageId = "<COUPON_ID>"
        EMMA.inAppMessage(cancelCouponRequest)
    }

    // MARK: - EMMA Coupon Delegate methods
    func onCouponsReceived(_ coupons: [EMMACoupon]!) {
        guard let receivedCoupons = coupons else {
            print("Error retrieving coupons")
            return
        }
        // Now we can send coupon impressions
        receivedCoupons.forEach { (coupon) in
            EMMA.sendImpression(.campaignCoupon, withId: String(coupon.couponId))
        }
        print("Received coupons \(receivedCoupons)")
    }

    func onCouponsFailure() {
        print("Error retrieving coupons")
    }

    func onCouponValidRedeemsReceived(_ validRedeems: Int) {
        if validRedeems > 0 {
            print("Coupon have valid redeems pending \(validRedeems)")
        }
    }
}
// CouponExampleViewController.h
#import <UIKit/UIKit.h>
#import "EMMA_iOS/EMMA_iOS.h"

@interface CouponExampleViewController : UIViewController<EMMACouponDelegate>
@end

// CouponExampleViewController.m
#import <Foundation/Foundation.h>
#import <UIKit/UIKit.h>
#import "EMMA_iOS/EMMA_iOS.h"

#import "CouponExampleViewController.h"

@interface CouponExampleViewController ()

@end

@implementation CouponExampleViewController

- (void)viewDidLoad {
    [super viewDidLoad];
    [EMMALegacy addCouponDelegate:self];
}

-(void) getAllCoupons {
    EMMAInAppRequest * couponsRequest = [[EMMAInAppRequest alloc] initWithType:Coupons];
    [EMMALegacy inAppMessage:couponsRequest];
}

-(void) sendCouponClick:(EMMACoupon*) coupon {
    [EMMALegacy sendClick:kCampaignCoupon withId:[@(coupon.couponId) stringValue]];
}

-(void) getSingleCoupon {
    EMMAInAppRequest * couponRequest = [[EMMAInAppRequest alloc] initWithType:Coupons];
    couponRequest.inAppMessageId = @"<COUPON_ID>";
    [EMMALegacy inAppMessage:couponRequest];
}

-(void) checkCouponsRedeem {
    EMMAInAppRequest *couponsRequest = [[EMMAInAppRequest alloc] initWithType:CouponValidRedeems];
    couponsRequest.inAppMessageId = @"<COUPON_ID>";
    [EMMALegacy inAppMessage:couponsRequest];
}

-(void) redeemCoupon {
    EMMAInAppRequest *redeemRequest = [[EMMAInAppRequest alloc] initWithType:RedeemCoupon];
    redeemRequest.inAppMessageId = @"<COUPON_ID>";
    [EMMALegacy inAppMessage:redeemRequest];
}

-(void) cancelCoupon {
    EMMAInAppRequest * cancelCouponRequest = [[EMMAInAppRequest alloc] initWithType: CancelCoupon];
    cancelCouponRequest.inAppMessageId = @"<COUPON_ID>";
    [EMMALegacy inAppMessage:cancelCouponRequest];
}

-(void)onCouponsFailure {
    NSLog(@"Error retrieving coupons");
}

-(void)onCouponsReceived:(NSArray<EMMACoupon *> *)coupons {
    for (EMMACoupon * coupon in coupons) {
        NSLog(@"Coupon %lo received", coupon.couponId);
        // Show coupon
        [EMMALegacy sendImpression: kCampaignCoupon withId:[@(coupon.couponId) stringValue]];
    }
}

-(void) onCouponValidRedeemsReceived:(int)validRedeems {
    if (validRedeems > 0) {
        NSLog(@"Coupon have valid redeems pending %d", validRedeems);
    }
}
@end
¶ Details of a coupon
With this call, we will obtain the information related to a specific coupon.
The couponId parameter must be the internal EMMA identifier of a coupon, identifier that can be obtained from a previous call to Coupons.
In the response block, we will obtain a dictionary with the information related to the consulted coupon: id (EMMA internal identifier), code, maximum number of redemptions, number of times redeemed, title, description, image, etc.
    func getSingleCoupon() {
        let couponsRequest = EMMAInAppRequest(type: .Coupons)
        couponsRequest?.inAppMessageId = "<COUPON_ID>"
        EMMA.inAppMessage(couponsRequest)
    }

    func onCouponsReceived(_ coupons: [EMMACoupon]!) {
        guard let receivedCoupons = coupons else {
            print("Error retrieving coupons")
            return
        }
        // Now we can send coupon impressions
        receivedCoupons.forEach { (coupon) in
            EMMA.sendImpression(.campaignCoupon, withId: String(coupon.couponId))
        }
        print("Received coupons \(receivedCoupons)")
    }
-(void) getSingleCoupon {
    EMMAInAppRequest * couponRequest = [[EMMAInAppRequest alloc] initWithType:Coupons];
    couponRequest.inAppMessageId = @"<COUPON_ID>";
    [EMMALegacy inAppMessage:couponRequest];
}

-(void)onCouponsReceived:(NSArray<EMMACoupon *> *)coupons {
    for (EMMACoupon * coupon in coupons) {
        NSLog(@"Coupon %lo received", coupon.couponId);
        // Show coupon
        [EMMALegacy sendImpression: kCampaignCoupon withId:[@(coupon.couponId) stringValue]];
    }
}
¶ Check the validity of a coupon
With this call we can check if the user can redeem the indicated coupon.
The couponId parameter must be the internal EMMA identifier of a coupon, identifier that can be obtained from a call to checkForCoupons made previously.
In the block response, it will indicate the number of times the user can still redeem the coupon.
    func checkCouponRedeems() {
        let couponsRequest = EMMAInAppRequest(type: .CouponValidRedeems)
        // You must pass coupon id to check
        couponsRequest?.inAppMessageId = "<COUPON_ID>"
        EMMA.inAppMessage(couponsRequest)
    }

    func onCouponValidRedeemsReceived(_ validRedeems: Int) {
        if validRedeems > 0 {
            print("Coupon have valid redeems pending \(validRedeems)")
        }
    }
-(void) checkCouponsRedeem {
    EMMAInAppRequest *couponsRequest = [[EMMAInAppRequest alloc] initWithType:CouponValidRedeems];
    couponsRequest.inAppMessageId = @"<COUPON_ID>";
    [EMMALegacy inAppMessage:couponsRequest];
}

-(void) onCouponValidRedeemsReceived:(int)validRedeems {
    if (validRedeems > 0) {
        NSLog(@"Coupon have valid redeems pending %d", validRedeems);
    }
}
¶ Redeem a coupon
With this call, the user redeems the indicated coupon.
The couponId parameter must be the internal EMMA identifier of a coupon, an identifier that can be obtained from a previously made Coupons call.
    func redeemCoupon() {
    	let redeemCouponRequest = EMMAInAppRequest(type: .RedeemCoupon)
      redeemCouponRequest?.inAppMessageId = "<COUPON_ID>"
      EMMA.inAppMessage(redeemCouponRequest)
    }
-(void) redeemCoupon {
     EMMAInAppRequest *couponsRequest = [[EMMAInAppRequest alloc] initWithType:CouponValidRedeems];
    couponsRequest.inAppMessageId = @"<COUPON_ID>";
    [EMMALegacy inAppMessage:couponsRequest];
}
¶ Cancel a coupon
With this call it is possible to cancel the redemption of a coupon previously made.
The couponId parameter must be the EMMA internal identifier of a coupon identifier that can be obtained in the Coupons type call.
Optionally you can specify a count parameter if you want to cancel more than one previously performed redemption. If not specified, the coupon will be canceled once.
Error 511 reports that the redeem could not be completed for some reason. Some possible causes could be the interruption of the connection with the DB or multiple redemptions affected by capping. We recommend, in these cases, to handle this error and notify the end user.
    func cancelCoupon() {
        let cancelCouponRequest = EMMAInAppRequest(type: .CancelCoupon)
        cancelCouponRequest?.inAppMessageId = "<COUPON_ID>"
        EMMA.inAppMessage(cancelCouponRequest)
    }
-(void) cancelCoupon {
    EMMAInAppRequest * cancelCouponRequest = [[EMMAInAppRequest alloc] initWithType: CancelCoupon];
    cancelCouponRequest.inAppMessageId = @"<COUPON_ID>";
    [EMMALegacy inAppMessage:cancelCouponRequest];
}
¶ DynamicTab
The EMMA TabBar View (DynamicTab) allows you to display HTML information in a new section of your application (only in case you already use a TabBar in your app).
The new TabBar Item can be created locally or in the EMMA platform. If both ways are used, the dynamic TabBar Item created directly in EMMA will prevail.
To enable this possibility in your app, you will need to implement at least the first method. It can be configured by following these instructions:
The TabBar item index and the item itself can be specified in the EMMA platform. As indicated above, the configuration in EMMA will always override the local configuration.
    func getDynamicTabBar() {
        // You must define your UITabBarController
        // Uncomment following line!
        // EMMA.setPromoTabBarController(UITabBarController!)

        // Sets default promo tab index if not defined in EMMA Platform
        EMMA.setPromoTabBarIndex(5)

        // Sets a tab bar item to be shown if not defined in EMMA Platform
        // EMMA.setPromoTabBarItem(UITabBarItem!)

        let dynamicTabBarRequest = EMMAInAppRequest(type: .PromoTab)
        EMMA.inAppMessage(dynamicTabBarRequest)
    }
-(void) getDynamicTarBar {
    // You must define your UITabBarController
    // Uncomment following line!
    //[EMMALegacy setPromoTabBarController:<#(UITabBarController *)#>];

    // Sets default promo tab index if not defined in EMMA Platform
    [EMMALegacy setPromoTabBarIndex:5];

    // Sets a tab bar item to be shown if not defined in EMMA Platform
    //[EMMALegacy setPromoTabBarItem:<#(UITabBarItem *)#>];

    EMMAInAppRequest * dynamicRequest = [[EMMAInAppRequest alloc] initWithType:PromoTab];
    [EMMALegacy inAppMessage:dynamicRequest];
}
¶ Custom plugins
¶ Create plugin
As of version 4.9.0 the possibility to add in-app plugins to the SDK has been added. In-app plugins work through NativeAd technology.
You can create your own communication format and turn it into an in-app plugin, for this it is necessary that the main class of the new format extends the abstract class EMMAInAppPlugin, this class forces to override two methods:
import EMMA_iOS

public class CustomInAppPlugin: EMMAInAppPlugin {

    public func getId() -> String {
        return "emma-plugin-custom"
    }

    public func show(_ nativeAd: EMMANativeAd) {
       // Process data
    }

    public func dismiss() {

    }
}
// CustomInAppPlugin.h
#import <UIKit/UIKit.h>
#import "EMMA_iOS/EMMA_iOS.h"

@interface CustomInAppPlugin:  NSObject<EMMAInAppPluginProtocol>
@end

// CustomInAppPlugin.m
#import <Foundation/Foundation.h>

#import "CustomInAppPlugin.h"

@implementation CustomInAppPlugin

- (void)dismiss {

}

- (NSString * _Nonnull)getId {
    return @"emma-plugin-custom";
}

- (void)show:(EMMANativeAd * _Nonnull)nativeAd {
    // Process data
}

@end
The show() method is the main method because it is the one that launches the SDK when it receives the NativeAd corresponding to the plugin, the SDK passes to the plugin the NativeAd with the content according to the template marked as a plugin in the Dashboard. With these parameters you can create any communication format adapted to the content of the NativeAd.
The dismiss() method is to hide the plugin automatically. At the moment, the SDK does not have this functionality built in, it leaves the control of hiding to the plugin itself.
The getId() method returns the plugin identifier that corresponds to the templateId generated in the template.
The EMMAInAppPlugin class contains several static methods such as sendInAppImpression and sendInAppClick. As in NativeAd, you can send these actions. You can also invoke the inappMessageListener with the invokeShownListeners, invokeCloseListeners and invokeHideListeners methods.
You can check the plugin example here.
¶ Integrate plugin
To integrate a plugin it is necessary to add it in the SDK after the login, for this it is necessary to use the addInAppPlugin method.
 func application(_ application: UIApplication, didFinishLaunchingWithOptions launchOptions: [UIApplication.LaunchOptionsKey : Any]? = nil) -> Bool {
      ....
      EMMA.startSession(with: configuration)
      EMMA.addInAppPlugin([CustomInAppPlugin()])
      return true
 }
- (BOOL)application:(UIApplication *)application didFinishLaunchingWithOptions:(NSDictionary *)launchOptions {
    [EMMALegacy startSessionWithConfiguration:configuration];
    ....
    [EMMALegacy addInAppPlugins:@[[CustomInAppPlugin new]]];

    return YES;
}
Once the SDK has the plugin you simply have to call it in the part of the app where it is required as if it were a NativeAd.
import UIKit

class HomeViewController: UIViewController {

    override func viewDidLoad() {
        super.viewDidLoad()

     let nativeAdRequest = EMMANativeAdRequest()
     nativeAdRequest.templateId = "emma-plugin-custom"
     EMMA.inAppMessage(request: nativeAdRequest)
   }
}
@implementation HomeViewController

- (void)viewDidLoad {
    [super viewDidLoad];
    EMMANativeAdRequest * nativeAdRequest = [EMMANativeAdRequest new];
    nativeAdRequest.templateId = @"emma-plugin-custom";
    [EMMALegacy inAppMessage: nativeAdRequest withDelegate:self];
}
@end
¶ How to integrate In-App campaigns
Below is a complete example of how to integrate In-App campaigns with EMMA.
import UIKit
import EMMA_iOS

class InAppExampleViewController: UIViewController, EMMAInAppMessageDelegate {

    override func viewDidLoad() {
        super.viewDidLoad()
        getStartView()
        // You can add as many request delegates as you want
        EMMA.add(inAppDelegate: self)

        //Check if any adball is showing
        if EMMA.isAdBallShowing() {
            print("There is an adball floating arround")
        }
    }

    // MARK: - EMMA InApp Messages Requests

    func getStartView() {
        let startViewinAppRequest = EMMAInAppRequest(type: .Startview)
        // Optional. You can filter by label
        startViewinAppRequest?.label = "<LABEL>"
        /*
         By default Startview presents on UIApplication.shared.delegate?.window?.rootViewController
         You can customize this behavior uncommenting following line
        */
        //EMMA.setRootViewController(UIViewController!)
        EMMA.inAppMessage(startViewinAppRequest)
    }

    func getBanner() {
        let bannerRequest = EMMAInAppRequest(type: .Banner)
        EMMA.inAppMessage(bannerRequest)
    }

    func getAdBall() {
        let adballRequest = EMMAInAppRequest(type: .Adball)
        EMMA.inAppMessage(adballRequest)
    }

    func getDynamicTabBar() {
        // You must define your UITabBarController
        // Uncomment following line!
        // EMMA.setPromoTabBarController(UITabBarController!)

        // Sets default promo tab index if not defined in EMMA Platform
        EMMA.setPromoTabBarIndex(5)

        // Sets a tab bar item to be shown if not defined in EMMA Platform
        // EMMA.setPromoTabBarItem(UITabBarItem!)

        let dynamicTabBarRequest = EMMAInAppRequest(type: .PromoTab)
        EMMA.inAppMessage(dynamicTabBarRequest)
    }

    func getStrip() {
        let stripRequest = EMMAInAppRequest(type: .Strip)
        EMMA.inAppMessage(stripRequest)
    }


    // MARK: - EMMA InApp Message Delegate

    func onShown(_ campaign: EMMACampaign!) {
        guard let c = campaign else {
            print("Error getting campaign info")
            return
        }
        print("Shown campaign \(c)")
    }

    func onHide(_ campaign: EMMACampaign!) {
        guard let c = campaign else {
            print("Error getting campaign info")
            return
        }
        print("Hide campaign \(c)")
    }

    func onClose(_ campaign: EMMACampaign!) {
        guard let c = campaign else {
            print("Error getting campaign info")
            return
        }
        print("Closed campaign \(c)")
    }
}
// InAppExampleViewController.h
#import <UIKit/UIKit.h>
#import "EMMA_iOS/EMMA_iOS.h"

@interface InAppExampleViewController : UIViewController<EMMAInAppMessageDelegate>
@end

// InAppExampleViewController.m
#import <Foundation/Foundation.h>
#import <UIKit/UIKit.h>
#import "EMMA_iOS/EMMA_iOS.h"

#import "InAppExampleViewController.h"

@interface InAppExampleViewController ()

@end

@implementation InAppExampleViewController

- (void)viewDidLoad {
    [super viewDidLoad];
    [self getStartView];
    [EMMALegacy addInAppDelegate:self];

    if ([EMMALegacy isAdBallShowing]) {
        NSLog(@"There is an adball floating arround");
    }
}


-(void) getStartView {
    /* By default Startview presents on UIApplication.shared.delegate?.window?.rootViewController
    You can customize this behavior uncommenting following line */
    //[EMMALegacy setRootViewController:(UIViewController *)]
    EMMAInAppRequest *startViewRequest = [[EMMAInAppRequest alloc] initWithType: Startview];
    [EMMALegacy inAppMessage:startViewRequest];
}

-(void) getBanner {
    EMMAInAppRequest *bannerRequest = [[EMMAInAppRequest alloc] initWithType:Banner];
    [EMMALegacy inAppMessage:bannerRequest];
}

-(void) getAdBall {
    EMMAInAppRequest * adballRequest = [[EMMAInAppRequest alloc] initWithType: Adball];
    [EMMALegacy inAppMessage:adballRequest];
}

-(void) getDynamicTarBar {
    // You must define your UITabBarController
    // Uncomment following line!
    //[EMMALegacy setPromoTabBarController:<#(UITabBarController *)#>];

    // Sets default promo tab index if not defined in EMMA Platform
    [EMMALegacy setPromoTabBarIndex:5];

    // Sets a tab bar item to be shown if not defined in EMMA Platform
    //[EMMALegacy setPromoTabBarItem:<#(UITabBarItem *)#>];

    EMMAInAppRequest * dynamicRequest = [[EMMAInAppRequest alloc] initWithType:PromoTab];
    [EMMALegacy inAppMessage:dynamicRequest];
}

-(void) getStrip {
    EMMAInAppRequest * stripRequest = [[EMMAInAppRequest alloc] initWithType: Strip];
    [EMMALegacy inAppMessage:stripRequest];
}

- (void)onClose:(EMMACampaign *)campaign {
    if (campaign) {
        NSLog(@"Closed campaign %@", campaign);
    }
}

- (void)onHide:(EMMACampaign *)campaign {
    if (campaign) {
        NSLog(@"Hide campaign %@", campaign);
    }
}

- (void)onShown:(EMMACampaign *)campaign {
    if (campaign) {
        NSLog(@"Shown campaign %@", campaign);
    }
}

@end
¶ Other In-App Messaging options
¶ EMMA Whitelist
With this functionality we can limit the URLs that the EMMA SDK will open, so that in the In-App communications, only the content that begins with one of the URLs that we have indicated in the whitelist will be shown in a Webview.
If we do not indicate any URL in the whitelist, any URL is allowed.
This functionality would affect Push (Rich URL), Banners, StartViews, AdBalls and DynamicTabs.
Communications (Banners, StartViews, AdBalls and DynamicTabs) can load external content to the app through a Webview and for Banners, AdBalls and DynamicTabs they could load external images that would also be controlled by the whitelist.
For a Push with Rich URL, if it does not comply, the corresponding Webview would not open, but the push does reach the app, note that if instead of a URL a deeplink is used, the deeplink scheme must be added to the whitelist to be able to open it.
¶ How to use it
This method must be called after the startSession and before calling any method related to In-App communications.
    func enableWhitelist() {
        // If set the SDK only allows communication with following domains
        EMMA.setWhitelist(["https://www.emma.io", "https://www.emmasolutions.net"])
    }
- (void) enableWhitelist {
   // If set the SDK only allows communication with following domains
   [EMMALegacy setWhitelist(@[@"https://www.emma.io", @"https://www.emmasolutions.net"]];
}
¶ Examples
If my whitelist is "http://mydomain.com".
-
Upload to EMMA dashboard a Banner with Target URL https://mydomain.com.
The Banner will not be displayed, we should add https://mydomain.com to the whitelist. -
Configure a StartView with StartView URL http://www.mydomain.com in the EMMA dashboard.
The StartView will not be displayed, we should add http://www.mydomain.com to the whitelist. -
Configure in the EMMA dashboard a Banner with Target URL http://mydomain.com/my/url and SmartPhone Banner URL http://subdomain.mydomain.com/my/image.
The Banner will not be displayed, the URL of the image does not comply with the whitelist, we should add to the whitelist http://subdomain.mydomain.com. -
We upload a Banner with Target URL http://mydomain.com/my/url/ to the EMMA dashboard.
The Banner will be displayed because the URL entered in the Target URL field starts with the same protocol and domain as the whitelist URL. -
We configure in the EMMA dashboard a StartView with StartView URL http://mydomain.com/mypage.html¶m=value.
The StartView will be displayed because the URL entered in the StartView URL field starts with the same protocol and domain as the whitelist URL.
¶ Control of the status of requests
The EMMA SDK allows you to monitor the status of in-app message requests using the EMMARequestDelegate protocol. This is useful to know in real time if an in-app campaign has been requested, if it comes with content that should be displayed or if it has failed.
Thus, and among other utilities, we can highlight that:
- It allows you to detect if there is content available (
containsData) and adapt your UI accordingly. - You can dynamically reserve space on the screen only when a campaign is active.
- Allows logging useful for tracking, A/B testing and error monitoring.
Example of implementation:
class MyViewController: UIViewController, EMMARequestDelegate {

    override func viewDidLoad() {
        super.viewDidLoad()
        requestInAppMessage()
    }

    func requestInAppMessage() {
        let request = EMMAInAppRequest(type: .Banner) // You can use .StartView, .Strip, etc.
        request.customId = "MY_INAPP_REQUEST"
        request.requestDelegate = self
        EMMA.inAppMessage(request: request)
    }

    // MARK: - EMMARequestDelegate

    func onStarted(_ id: String!) {
        print("onStarted request with id: \(id ?? "nil")")
    }

    func onSuccess(_ id: String!, containsData: Bool) {
        print("onSuccess request with id: \(id ?? "nil"), containsData: \(containsData)")
        if containsData {
            // Show message or prepare space in the UI or something else
        } else {
            // If there is no content: hide or do not reserve space or something else
        }
    }

    func onFailed(_ id: String!) {
        print("onFailed request with id: \(id ?? "nil")")
        // Handle error or show alternative UI
    }
}
@interface MyViewController () <EMMARequestDelegate>
@end

@implementation MyViewController

- (void)viewDidLoad {
    [super viewDidLoad];
    [self requestInAppMessage];
}

- (void)requestInAppMessage {
    EMMAInAppRequest *request = [[EMMAInAppRequest alloc] initWithType:InAppTypeBanner];
    request.customId = @"MY_INAPP_REQUEST";
    request.requestDelegate = self;
    [EMMA inAppMessageWithRequest:request];
}

// MARK: - EMMARequestDelegate

- (void)onStarted:(NSString *)id {
    NSLog(@"onStarted request with id: %@", id);
}

- (void)onSuccess:(NSString *)id containsData:(BOOL)data {
    NSLog(@"onSuccess request with id: %@, containsData: %@", id, data ? @"YES" : @"NO");
    if (data) {
        // Show message or prepare space in the UI or something else
    } else {
        // If there is no content: hide or do not reserve space or something else
    }
}

- (void)onFailed:(NSString *)id {
    NSLog(@"onFailed request with id: %@", id);
    // Handle error or show alternative UI
}

@end
Summary of the methods of the EMMARequestDelegate:
| Method | When is it called | Possible uses |
|---|---|---|
onStarted |
Just before the request is sent | Start logs, display a load indicator, etc. |
onSuccess |
When the request is successfully completed | Verify containsData and adapt the UI |
onFailed |
If the request fails (network, server, etc.) | Show fallback, hide reserved space, etc. |
¶ Filter campaigns by tag
If you want, you can pass a custom String that labels the Campaign in case you use more than one Campaign of the same type in your app and you need to distinguish them.
        let startViewinAppRequest = EMMAInAppRequest(type: .Startview)
        // Optional. You can filter by label
        startViewinAppRequest?.label = "<LABEL>"
¶ Retrieve campaign parameters
Before proceeding, it is necessary to add the parameters to the communication in the EMMA dashboard so that the SDK picks them up and makes them available to the application. To learn more.
¶ NativeAd
We can get the campaign parameters once we have received the NativeAd, either in the onReceived method or in onBatchNativeAdReceived. To learn more about its implementation.
Example of use with onReceived:
class NativeAdViewController : UIViewController, EMMAInAppMessageDelegate {
    // ...

    func onReceived(_ nativeAd: EMMANativeAd!) {
        print(nativeAd.params)
    }
}
¶ All other formats
For the StartView, AdBall, Strip and Banner formats, the campaign parameters are obtained through the methods provided by the EMMAInAppMessageDelegate: onShown, onHide and onClose.
Each of these methods receives as parameter an instance of EMMACampaign, through which it is possible to access the campaign parameters through the campaign.params property.
Usage example:
// EMMAInAppMessageDelegate implementation
class HomeViewController: UIViewController, EMMAInAppMessageDelegate {
    // ...

    func onShown(_ campaign: EMMACampaign!) {
        if (campaign != nil && campaign.params != nil && campaign.params.count > 0) {
            print(campaign.params)
        }
    }

    func onClose(_ campaign: EMMACampaign!) {
        // Access to campaign.params if necessary
    }

    func onHide(_ campaign: EMMACampaign!) {
        // Access to campaign.params if necessary
    }
}
¶ Close in-app messages programmatically
closeInApp(type: InAppType) programmatically closes an active in-app communication of the specified type.
EMMA.closeInApp(type: InAppType.Adball)
Available types:
InAppType.BannerInAppType.AdballInAppType.StripInAppType.Startview
¶ Enable ad tracking with IDFA
Apple announced that with iOS 14 you would need explicit permission from users to track them or access the Advertiser Identifier (IDFA). That translated to mean that in order to link collected user or device data you will need to request permission through the AppTrackingTransparency framework. To request permission in the app use the following method:
if #available(iOS 14.0, *) {
    EMMA.requestTrackingWithIdfa()
}
if (@available(iOS 14, *)) {
    [EMMALegacy requestTrackingWithIdfa];
}
Remember to include a
NSUserTrackingUsageDescriptionkey in theInfo.plistfile. This message should clearly explain why your application is requesting permission to track user activity, as this is a requirement to comply with Apple's privacy policies. For more information, please refer to Apple's official documentation.
¶ Disable advertising tracking
EMMA allows you to disable tracking for those users who express this wish.
This method is the best way to adapt to the new RGPD (General Data Protection Regulation).
The user's communication to express this do-not-track option must be handled by the app by making a call to the following method:
public func disableUserTracking(deleteUserData: Bool) {
    /*
    EMMA.disableUserTracking shuts down all communication with EMMA servers
    If deleteUserData is true; EMMA will remove this device data from
    their servers. This is a unrecoverable action.
    */
    EMMA.disableUserTracking(deleteUserData)
}
- (void) disableUserTracking: (BOOL) deleteUserData {
    /*
    EMMA.disableUserTracking shuts down all communication with EMMA servers
    If deleteUserData is true; EMMA will remove this device data from
    their servers. This is a unrecoverable action.
    */
    [EMMALegacy disableUserTracking: deleteUserData];
}
In case you want to re-enable the user's communications, you can use this other method:
    public func enableUserTracking() {
        EMMA.enableUserTracking()
    }
- (void) enableUserTracking {
    [EMMALegacy enableUserTracking];
}