¶ Basic download and integration
¶ Download EMMA Android SDK
¶ Gradle
-
Add to the
/app/build.gradleor/app/settings.gradlefile, depending on your project, the repository where EMMA is located.repositories { maven { url 'https://repo.emma.io/emma' } } -
Add the dependency in the same
build.gradlefile.
If you are using the new Android Gradle Plugin version 8 and have the minifyEnabled option set to true you need to update the SDK to version 4.14.1 or higher to avoid a possible crash with one of our dependencies. If the update is not possible, please modify the Proguard rules in the section below.
dependencies {
  	implementation 'io.emma:eMMaSDK:4.14.+'
}
dependencies {
  	implementation("io.emma:eMMaSDK:4.14.+")
}
-
If you use proguard see the documentation about proguard.
-
Finally, compile the project with gradle.
The latest version of the SDK is 4.16.0. See this page for details on updates.
¶ Basic integration
¶ Units
- Obtain EMMA
Session Key
Consult the documentation to see where you can get yourEMMA Keyon the EMMA documentation page
¶ SDK required permissions
The SDK contains by default the following mandatory permissions. These permissions DO NOT have to be added in the AndroidManifest.xml of the application, as they are added by the SDK itself:
<uses-permission android:name="android.permission.INTERNET" />
<uses-permission android:name="android.permission.ACCESS_NETWORK_STATE"/>
<uses-permission android:name="android.permission.VIBRATE"/>
<uses-permission android:name="com.google.android.gms.permission.AD_ID"/>
If you want to enable localization, you have to add the following permissions to the AndroidManifest.xml of your application:
<uses-permission android:name="android.permission.ACCESS_FINE_LOCATION"/>
<uses-permission android:name="android.permission.ACCESS_COARSE_LOCATION" />
¶ Huawei
If the app is going to be uploaded to AppGallery or run on HMS compatible devices, it is necessary to add the connection with Huawei and the library to get a unique identifier for the device.
In the build.gradle of the project add the Huawei plugin.
      buildscript {
       repositories {
          google()`
          jcenter()
          maven { url 'http://developer.huawei.com/repo/' }
       }
       dependencies {
          classpath 'com.android.tools.build:gradle:7.4.1'
          classpath 'com.huawei.agconnect:agcp:1.6.2.300'
       }
      }
      allprojects {
       repositories {
          google()
          jcenter()
          maven {url 'https://developer.huawei.com/repo/'}
       }
      }
In the build.gradle of the application, add the following dependency and apply the plugin to collect the configuration information of the app in Huawei.
        dependencies {
     // other dependencies
     implementation 'com.huawei.hms:ads-identifier:3.4.62.300'
    }
    apply plugin: 'com.huawei.agconnect'
¶ Obtaining credentials
To obtain credentials you first need to create an account at developer.huawei.com and become a developer.
Once you have created an account you have to add an application in Huawei AppGallery Connect. The app is created in draft mode, to make the push integration is your client.
Once the app is created we can activate the Push Kit (it is optional, only if you want integrate push notifications) in the develop section. Inside Project Settings the information about the app will appear.
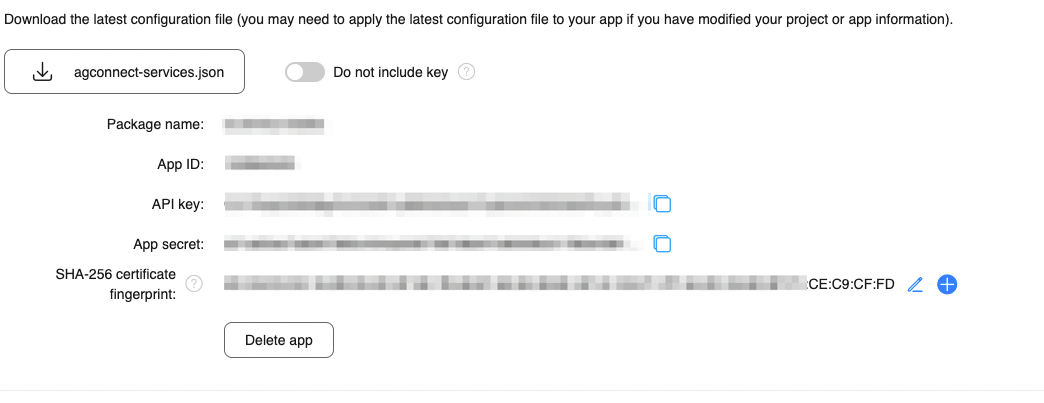
It is necessary to add the fingerprint of the certificate used for signing the app.
We download the agconnect-services.json and add it in /app. This way the HMS service will be able to authenticate the app.
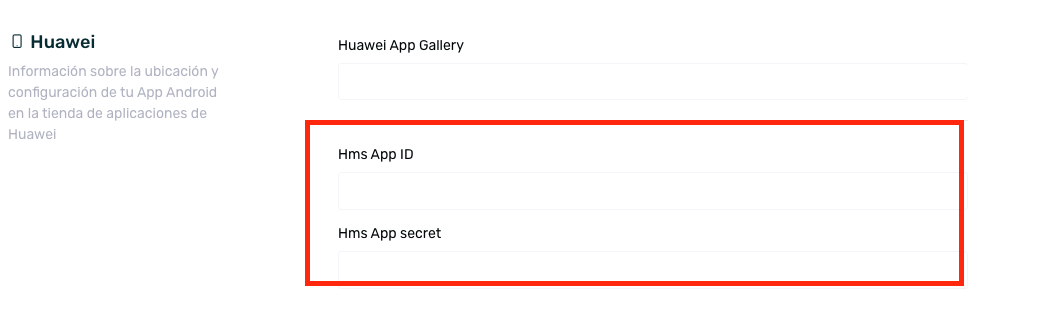
Add the appId and appSecret in the app preferences section of the EMMA dashboard.
¶ Initialize the library
In your Application class, add the following:
import android.app.Application
import io.emma.android.EMMA

class ExampleApplication : Application() {

    override fun onCreate() {
        super.onCreate()

        val configuration = EMMA.Configuration.Builder(this)
            .setSessionKey("example0ikl98")
            .setDebugActive(BuildConfig.DEBUG)
            .build()

        EMMA.getInstance().startSession(configuration)
    }
}
import android.app.Application;
import io.emma.android.EMMA;

public class ExampleApplication extends Application {

    @Override
    public void onCreate() {
        super.onCreate();

        EMMA.Configuration configuration = new EMMA.Configuration.Builder(this)
                .setSessionKey("example0ikl98")
                .setDebugActive(BuildConfig.DEBUG)
                .build();

        EMMA.getInstance().startSession(configuration);
    }
}
¶ Disable sending of screenshots
Screen sending is enabled by default in the EMMA SDK. To disable it use the following configuration.
import android.app.Application
import io.emma.android.EMMA

class ExampleApplication : Application() {

    override fun onCreate() {
        super.onCreate()

        val configuration = EMMA.Configuration.Builder(this)
            .setSessionKey("example0ikl98")
            .trackScreenEvents(false)
            .setDebugActive(BuildConfig.DEBUG)
            .build()

        EMMA.getInstance().startSession(configuration)
    }
}
¶ Defer SDK startup (Optional)
Instead of doing it from your Application class, you can defer SDK initialisation by calling startSession from an Activity class.
If the application invokes
startSessionfrom anActivityclass, it is necessary to provide the context of that activity to the SDK withsetCurrentActivity().
Example of use:
class ExampleActivity : ComponentActivity() {

    override fun onCreate() {
        super.onCreate()

        val configuration = EMMA.Configuration.Builder(this)
            .setSessionKey("example0ikl98")
            .setDebugActive(BuildConfig.DEBUG)
            .build()

        EMMA.getInstance().startSession(
             configuration,
             EMMASessionStartListener {
                 EMMA.getInstance().setCurrentActivity(this)
             }
        )
    }
}
¶ Acquisition Integration
¶ POWLINK integration
¶ Dependencies
-
Configure sub-domain for POWLINK
To support Powlink on Android, see the support guide to configure Powlink on the EMMA dashboard.
¶ Add Activity to process Deeplinks
Knowing the subdomain that corresponds to your POWLINKS, you must add a new activity to the AndroidManifest.xml of your application as indicated below. This activity is the one that must also be used for the deeplink, as explained below.
<activity
     android:name="io.emma.android.activities.EMMADeepLinkActivity"
     android:noHistory="true"
     android:exported="true"
     android:theme="@android:style/Theme.NoDisplay">

     <intent-filter>
          <action android:name="android.intent.action.VIEW"/>

          <category android:name="android.intent.category.DEFAULT"/>
          <category android:name="android.intent.category.BROWSABLE"/>

          <data android:scheme="{YOUR_DEEPLINK_SCHEME}"/>
     </intent-filter>

     <intent-filter android:autoVerify="true">
         <action android:name="android.intent.action.VIEW"/>

         <category android:name="android.intent.category.DEFAULT"/>
         <category android:name="android.intent.category.BROWSABLE"/>

          <data
             android:host="subdomain.powlink.io"
             android:scheme="https"/>

          <data
             android:host="shortsubdomain.pwlnk.io"
             android:scheme="https"/>

     </intent-filter>
</activity>
As detailed below in the Rich push URL uso DeepLinking section, it is necessary to add a metadata within the <application> tag that specifies the activity in charge of handling the POWLINK url.
<meta-data
    android:name="io.emma.DEEPLINK_OPEN_ACTIVITY"
    android:value="com.your.package.CustomDeeplinkActivity"/>
As we said, the Rich push URL uso DeepLinking section shows how you can handle the received POWLINKS or Deeplinks in order to process them and display the corresponding part of your application.
¶ POWLINK with own domain
If you are using a tracker with a non-EMMA domain (.powlink.io or .pwlnk.io), it is necessary to add the domain when starting the library.
val configuration = EMMA.Configuration.Builder(this)
        .setSessionKey("example0ikl98")
        .setDebugActive(BuildConfig.DEBUG)
        .setShortPowlinkDomains("emma.link.mycompany.com")
        .setPowlinkDomains("emma.link.mycompany.com")
        .build()

 EMMA.getInstance().startSession(configuration)
¶ Push Notification Integration
To differentiate a notification from our push system with respect to other systems, the payload sent by EMMA contains a flag called "eMMa".
EMMA offers a complete Push Notification delivery and reporting system that is easy to integrate using Firebase Cloud Messaging (FCM) on Android.
First get your own Sender ID and Server Key for FCM as specified in this article and set these parameters for the app in your EMMA account.
To integrate FCM into your app follow the steps below:
- The following service must be added to
AndroidManifest.xml:
<service
    android:name="io.emma.android.push.EMMAFcmMessagingService"
    android:enabled="true"
    android:exported="false">
    <intent-filter>
    <action android:name="com.google.firebase.MESSAGING_EVENT"/>
    </intent-filter>
</service>
- We add the following dependency to the
build.gradlelocated in the root of the project:
// build.gradle file
buildscript {
    // ...
    dependencies {
    // ...
    classpath 'com.google.gms:google-services:4.3.10' // google-services plugin`
    }
}
allprojects {
    // ...
    repositories {
    // ...
    google() // Google's Maven repository`
    }
}
// <project>/build.gradle.kts file
plugins {
    // Add the dependency for the Google services Gradle plugin
    id("com.google.gms.google-services") version "4.3.10" apply false
}

// <project>/<app-module>/build.gradle.kts file
plugins {
    // Add the Google services Gradle plugin
    id("com.google.gms.google-services")
}
- In the
build.gradleof the app we add the Firebase dependency:
apply plugin: 'com.android.application'

android {
    // ...
}

dependencies {
    //
    // ...
    implementation 'io.emma:eMMaSDK:4.12.+'
    implementation 'com.google.firebase:firebase-messaging:23.1.0'
}
// ADD THIS AT THE BOTTOM
apply plugin: 'com.google.gms.google-services'
dependencies {
    // ...
    implementation("com.google.firebase:firebase-messaging:24.0.1")
}
- Add the
google-services.jsonin the/appdirectory inside the project. You can get here more information to obtain the file. Without this file push notifications will not work, it is mandatory to add it. - In the case of using a server key "Legacy " it is still valid and supported by Google, although it is recommended to use the FCM Server Key.
- Start the push system under the
Applicationlogin:
override fun onCreate() {
    super.onCreate();

    EMMA.Configuration configuration = new EMMA.Configuration.Builder(this)
            .setSessionKey("example0ikl98")
            .setDebugActive(BuildConfig.DEBUG)
            .build();

    EMMA.getInstance().startSession(configuration);

    val pushOpt = EMMAPushOptions.Builder(PushActivity::class.java, R.drawable.notification_icon)
                .setNotificationColor(ContextCompat.getColor(this, R.color.yellow))
                .setNotificationChannelName("My custom channel")
                .setNotificationChannelId("My custom id")
                .build()

    EMMA.getInstance().startPushSystem(configuration);
}
PushActivity::class.java: activity that will open when the push notification is received.R.drawable.notification_icon: small icon that appears in the status bar and next to the notification text. This is different from the images that can be included in the push notification content.setNotificationColor()(optional).setNotificationChannelName()(optional): name of the notification channel.setNotificationChannelId()(optional): unique identifier of the notification channel.
Once
startPushSystemis configured, the SDK automatically handles the content provided on the EMMA platform (title, message, images and GIFs, action buttons, etc.). Therefore, no additional code is required to display rich content.
- Since Android 13 to receive notifications it is necessary to request permission from the user. To do this, EMMA has added a method to the SDK available in version 4.12 or higher. For correct operation this method has to be called in an Activity. If the app already has a personalized alert or already integrates the permission request by default, there is no need to use this method:
class HomeActivity : Activity() {
    override fun onCreate(savedInstanceState: Bundle?) {
        super.onCreate(savedInstanceState);
        EMMA.getInstance().requestNotificationsPermission();
    }
}
- Add
onNewIntent()method callingEMMA.onNewNotification(), which will check if the user has received a notification when the app is open.
override fun onNewIntent(intent: Intent) {
    super.onNewIntent(intent);
    EMMA.getInstance().onNewNotification(this, intent, true);
}
The boolean that has as parameter the
onNewNotificationmethod checks that the push contains Rich Push Url in case it is set to true.
- To check the
richPushUrlwhen the app is opened from the notification, add in the push activity the following:
class HomeActivity : Activity() {
    override fun onCreate(savedInstanceState: Bundle?) {
        super.onCreate(savedInstanceState);
        EMMA.getInstance().checkForRichPushUrl();
    }
}
The
checkForRichPushUrlmay also be used anywhere in the app if preferred.
- If your app is based on a WebView, you need to add the
checkForRichPushUrlin the following method:
webView.webViewClient = object : WebViewClient() {
    ...
     override fun onPageFinished(view: WebView, url: String) {
        EMMA.getInstance().checkForRichPushUrl();
    }
}
- Optionally, if you want to control what you receive from a Push, your Activity must implement the
EMMANotificationInterfaceinterface and theonPushOpenmethod that will be called when the user opens the notification.
class ExampleActivity : Activity(), EMMANotificationInterface {
    override fun onCreate(savedInstanceState: Bundle?) {
        super.onCreate(savedInstanceState);
        EMMA.getInstance().getNotificationInfo();
    }

    override fun onPushOpen(pushCampaign: EMMAPushCampaign) {
        //Do whatever you want with push campaign
    }
}
Unregister push notifications
To disable notifications on a device, use EMMA.getInstance().unregisterPushSystem() and ensure that you do not call EMMA.getInstance().startPushSystem(...) again.
¶ Push with customized colors
You can select the color you want in push notifications by adding the setNotificationColor to the push options:
    val pushOpt = EMMAPushOptions.Builder(PushActivity::class.java, R.drawable.notification_icon)
                .setNotificationColor(ContextCompat.getColor(this, R.color.yellow))
                .build()

    EMMA.getInstance().startPushSystem(configuration);
¶ Custom sounds in push notifications
SDK version 2.5.5 or higher is required.
To use custom sounds in the notifications you send with EMMA, you have to add the sound files you want to the raw folder of your app resources (res folder). Remember to use the same file names for the sounds in iOS and Android.
¶ Rich push URL use DeepLinking
You can redirect push notifications openings to a section in your app. To do this you should use a structure like this:
scheme://host/page1/page2/page3...
Version 4.2 brings changes concerning the management of the deeplink. To integrate it follow the steps below:
- Add the following activity in the
AndroidManifest.xml:
    <activity
        android:name="io.emma.android.activities.EMMADeepLinkActivity" android:theme="@android:style/Theme.NoDisplay">
    <intent-filter>
        <action android:name="android.intent.action.VIEW"/>
        <category android:name="android.intent.category.DEFAULT"/>
        <category android:name="android.intent.category.BROWSABLE"/>
        <data android:scheme="YOUR_SCHEME"`
            android:host="YOUR_HOST"/>
    </intent-filter>
</activity>
- Add the activity to be launched, in the form of
<meta-data>inside the<application>tag inAndroidManifest.xml. This activity will be triggered when the SDK executes a deeplink:
<meta-data
    android:name="io.emma.DEEPLINK_OPEN_ACTIVITY"
    android:value="com.your.package.CustomDeeplinkActivity"/>
Remember that in case it is an activity that can be found open in the app when a deeplink is executed, it has to be declared in the AndroidManifest.xml as singleTask:
<activity`
    android:name=".activities.MainActivity"
    android:launchMode="singleTask"/>
In this case, if the activity is on the stack when the deeplink is executed, the intent with the deeplink information will reach the activity's onNewIntent method. In case of not having the launchMode as singleTask it causes the activity to be instantiated again, which produces duplications.
- For the deeplink that is entered in the Rich Push URL field (on the EMMA website) to be executed correctly, it is important to add the following method in the activity that is opened by the push or some other that is consequent to it, but that is executed when the app is opened from the notification:
override fun onCreate(savedInstanceState: Bundle?) {
    super.onCreate(savedInstanceState);
    EMMA.getInstance().checkForRichPush();
}
override fun onNewIntent(intent: Intent?) {
    super.onNewIntent(intent);
    EMMA.getInstance().onNewNotification(intent, true);
}
The checkForRichPush and onNewNotification methods check the Rich Push field sent in the notification payload and perform the appropriate actions. In the case of a deeplink they will execute it by opening the activity defined in the AndroidManifest.xml metadata.
- Define the behavior of the activity that has to open the deeplink. In this case
CustomDeepLinkActivity:
override fun onCreate(savedInstanceState: Bundle?) {
    super.onCreate(savedInstanceState);
    setContentView(R.layout.view);

    if (intent != null && intent.data != null ) {
        processDeepLink(intent.data);
    }
    finish();
}

private fun processDeepLink(uri: Uri) {
    if (uri.host.equals("home")) {
        goHome();
    }
}

override fun onNewIntent(intent: Intent?) {
    super.onNewIntent(intent);
    if (intent != null && intent.data != null ) {
        processDeepLink(intent.data);
    }
}
¶ Use a customized service
EMMA gives the possibility to integrate push notifications outside its own service.
class CustomService: FirebaseMessagingService() {

    private fun isPushFromEMMA(remoteMessage: RemoteMessage): Boolean {
        return remoteMessage.data["eMMa"] == "1"
    }

    override fun onMessageReceived(remoteMessage: RemoteMessage) {
        if (isPushFromEMMA(remoteMessage)) {
            EMMAPushNotificationsManager.handleNotification(applicationContext, remoteMessage.data)
        }
    }

    override fun onNewToken(token: String) {
        EMMAPushNotificationsManager.refreshToken(applicationContext, token, EMMAPushType.FCM)
    }
}
¶ Buttons with actions
On version 4.10.x, the functionality of adding buttons with actions in notifications has been developed. To add this functionality to Android, you simply have to have the SDK updated to this version.
For the configuration in the interface consult here.
¶ Push Notification Integration with Huawei
On May 19, 2019, Google decided to terminate with Huawei those businesses that require hardware and software transfer, except those covered by open source licenses. This means that devices manufactured after this date will not have Google services such as the Play Store, although they will have the equivalent, the Huawei App Gallery.
From EMMA, we have modified our SDK to adapt it to the Huawei App Store. With the aim of measuring attribution as well as allowing Push notifications to be sent via their service.
The minimum version of the SDK available to make the Huawei integration is version 4.7.0. If you have an earlier version of the SDK, you will need to update it for everything to work properly.
To perform integration you have to follow the following steps:
- Add dependencies
- Add the service to the AndroidManifest
- Get credentials
¶ Adding the dependencies
- The first thing we need to do is to add the dependencies to the
build.gradleof the project.
buildscript {
 repositories {
    google()`
    jcenter()
    maven { url 'http://developer.huawei.com/repo/' }
 }
 dependencies {
    classpath 'com.android.tools.build:gradle:7.4.1'
    classpath 'com.huawei.agconnect:agcp:1.6.2.300'
 }
}
allprojects {
 repositories {
    google()
    jcenter()
    maven {url 'https://developer.huawei.com/repo/'}
 }
}
- Next we add the HMS dependencies to the application. The ads-identifier dependency allows to get the advertisement identifier used in Huawei. The push dependency allows the use of the HMS service for push notifications.
dependencies {
 // other dependencies
 implementation 'com.huawei.hms:ads-identifier:3.4.62.300'
 implementation 'com.huawei.hms:push:6.10.0.300'
}
apply plugin: 'com.huawei.agconnect'
The HMS service integration is compatible with the FCM integration in the EMMA SDK. The minimum Android version supported for HMS integration is Android 19.
¶ Adding the service to the AndroidManifest
The following service must be added to AndroidManifest.xml:
<service
 android:name="io.emma.android.push.EMMAHmsMessagingService"
 android:exported="false">
 <intent-filter>
    <action android:name="com.huawei.push.action.MESSAGING_EVENT" />
 </intent-filter>
</service>
¶ Obtaining credentials
To obtain the credentials go to the following section here.
Finally, we compile the app and we can now send push notifications to Huawei devices.
¶ Behavior Integration
With EMMA you can perform a complete integration of the SDK that allows you to know the location of your users, how they register in your App, how many transactions they perform and even their own characteristics. That is, all the information about your users that you will get in the Behavior section.
¶ Event tracking
The EMMA platform differentiates between two types of events. Those that the platform includes by default and the custom events that you want to integrate according to the structure of your application.
¶ Default events
You can find more information about default events here.
¶ Track Register
The EMMA.getInstance().registerUser() method allows you to send information about registrations in the application.
fun register() {
    EMMA.getInstance().registerUser("554234", "test@emma.io")
}
function register() {
    EMMA.getInstance().registerUser("554234", "test@emma.io")
}
¶ Track Login
The EMMA.getInstance().loginUser() method allows you to send information about login events.
If we have a successive login event with the same data, we can use the EMMA.loginDefault() method. This method would be useful in the case of an "Auto-Login", for example.
fun login() {
    EMMA.getInstance().loginUser("554234", "test@emma.io")
}
public void login() {
    EMMA.getInstance().loginUser("554234", "test@emma.io");
}
¶ Track Transactions
EMMA allows you to measure any transaction or purchase made in your app in a single call using the trackPurchase method.
val products = listOf(
    EMMAProduct("001", "Jeans", 29.99f, 1f),
    EMMAProduct("002", "T-Shirt", 19.99f, 2f)
)

val request = EMMAPurchaseRequest(
    id = "ORDER_12345",
    totalPrice = 69.97f,
    products = products
)

EMMA.getInstance().trackPurchase(request)
List<EMMAProduct> products = Arrays.asList(
    new EMMAProduct("001", "Jeans", 29.99f, 1f),
    new EMMAProduct("002", "T-Shirt", 19.99f, 2f)
);

EMMAPurchaseRequest request = new EMMAPurchaseRequest("ORDER_12345", 69.97f, products);

EMMA.getInstance().trackPurchase(request);
EMMAPurchaseRequest parameters:
id(String, required): unique transaction identifier.totalPrice(Float, required): total purchase price (must match the sum of products).products(List<EMMAProduct>, required): list of products included in the purchase (cannot be empty).customerId(String, optional): identifier of the user making the purchase. This is optional as it is taken from methods such assetCustomerId, for example.coupon(String, optional): coupon code applied to the purchase.- extras (Map<String, String>, optional): additional tags associated with the transaction.
EMMAProduct parameters:
id(String, required): unique product identifier.name(String, required): product name.price(Float, required): unit price of the product.qty(Float, required): quantity purchased of the product.extras(Map<String, String>, optional): additional product information.
The
trackPurchasemethod replaces the deprecatedstartOrder,addProductandtrackOrdermethods. We recommend migrating to the newtrackPurchasemethod for simpler and more robust transaction tracking.
// DEPRECATED
fun trackTransaction() {
    // Method for initiating the transaction
    EMMA.getInstance().startOrder("<ORDER_ID>","<CUSTOMER_ID>",10.0, "")
    // Once the transaction has begun, the products must be added to it
    EMMA.getInstance().addProduct("<PRODUCT_ID>", "<PRODUCT_NAME>", 1.0, 10.0)
    // Once we have added all the products, we execute the transaction measurement
    EMMA.getInstance().trackOrder()
}
// DEPRECATED
public void trackTransaction {
     // Method for initiating the transaction
     EMMA.getInstance().startOrder("<ORDER_ID>","<CUSTOMER_ID>",10.0, "");
     // Once the transaction has begun, the products must be added to it
     EMMA.getInstance().addProduct("<PRODUCT_ID>", "<PRODUCT_NAME>", 1.0, 10.0);
     // Once we have added all the products, we execute the transaction measurement
     EMMA.getInstance().trackOrder();
  }
¶ Customized events
Use EMMA.getInstance().trackEvent(request:) to count the number of times certain events occur during a session in your app.
This can be useful to measure how many times users convert on different actions, for example.
You can obtain event tokens by creating them on the EMMA platform. If a non-existing token is sent to EMMA, an error will be returned.
More general information on customized events can be found in the main documentation.
To send an event specific to your application, you can use the EMMAEventRequest class. It allows you to set an identifier, add custom attributes and define a listener to control the status of the request and check if it returns data (e.g. a rule) or not.
¶ Basic example
val eventRequest = EMMAEventRequest("f983d4bef8fc44dad43a1bb30dde9e3c")
EMMA.getInstance().trackEvent(eventRequest)
EMMAEventRequest eventRequest = new EMMAEventRequest("f983d4bef8fc44dad43a1bb30dde9e3c");
EMMA.getInstance().trackEvent(eventRequest);
¶ Advanced example with identifier, attributes and listener
val eventRequest = EMMAEventRequest(event)

// Optional. Add your request ID to capture it later
eventRequest.customId = "MY_EVENT_REQUEST"

// Optional: You can add your own custom event attributes
eventRequest.attributes = mapOf("test_attribute" to "test_value")

// Optional. You can capture EMMA requests with this listener
eventRequest.requestListener = object : EMMARequestListener {
      override fun onStarted(id: String) {
          Log.d(Constants.LOG_TAG, "Event request started")
      }

      override fun onSuccess(id: String, containsData: Boolean) {
          Log.d(Constants.LOG_TAG, "Event onSuccess, contains data: $containsData")
      }

      override fun onFailed(id: String) {
          Log.d(Constants.LOG_TAG, "Event onFailed")
      }
  }
}

EMMA.getInstance().trackEvent(eventRequest)
EMMAEventRequest eventRequest = new EMMAEventRequest(event);

// Optional. Add your request ID to capture it later
eventRequest.setCustomId("MY_EVENT_REQUEST");

// Optional: You can add your own custom event attributes
Map<String, String> attributes = new HashMap<>();
attributes.put("test_attribute", "test_value");
eventRequest.setAttributes(attributes);

// Optional. You can capture EMMA requests with this listener
eventRequest.setRequestListener(new EMMARequestListener() {
    @Override
    public void onStarted(String id) {
        Log.d(Constants.LOG_TAG, "Event request started");
    }

    @Override
    public void onSuccess(String id, boolean containsData) {
        Log.d(Constants.LOG_TAG, "Event onSuccess, contains data: " + containsData);
    }

    @Override
    public void onFailed(String id) {
        Log.d(Constants.LOG_TAG, "Event onFailed");
    }
});

EMMA.getInstance().trackEvent(eventRequest);
¶ User properties (TAGS)
At EMMA, we can enrich the user profile with information stored using key-value pairs through tags.
To send this information, we must implement the trackUserTags method:
val tags = mapOf(
   "age" to "25",
   "gender" to "female",
   "city" to "Madrid",
   "premium" to "true"
)

EMMA.getInstance().trackUserTags(tags)
Map<String, String> tags = new HashMap<>();
tags.put("age", "25");
tags.put("gender", "female");
tags.put("city", "Madrid");
tags.put("premium", "true");

EMMA.getInstance().trackUserTags(tags);
This method replaces the deprecated
trackExtraUserInfomethod, which will continue to work but it is recommended to migrate totrackUserTags.
// DEPRECATED
val tags = ArrayMap<String, String>()
tags["MY_CUSTOM_TAG"] = "MY_CUSTOM_VALUE"
EMMA.getInstance().trackExtraUserInfo(tags)
// DEPRECATED
Map<String, String> tags = new HashMap<>();
tags.put("MY_CUSTOM_TAG", "MY_CUSTOM_VALUE");
EMMA.getInstance().trackExtraUserInfo(tags);
¶ User location logging
If your application has location permissions, EMMA can store that information in the user's profile.
If you do not want to record the user's information, you must implement the disableTrackingLocation() method before executing the startSession call.
¶ User information
¶ EMMA identifier
We can retrieve the internal EMMA identifier with the getUserID():
    class MainActivity : BaseActivity(), EMMAUserInfoInterface {

    override fun onCreate(savedInstanceState: Bundle?) {
        super.onCreate(savedInstanceState)
        setContentView(R.layout.activity_main)

        EMMA.getInstance().getUserID()
    }

    override fun OnGetUserInfo(userInfo: JSONObject?) {
      // Not implemented
    }

    override fun OnGetUserID(id: Int) {
            Log.d("MainActivity", id.toString())
    }
}
public class MainActivity extends BaseActivity implements EMMAUserInfoInterface {

    @Override
    protected void onCreate(Bundle savedInstanceState) {
        super.onCreate(savedInstanceState);
        setContentView(R.layout.activity_main);

        EMMA.getInstance().getUserID();
    }

    @Override
    public void OnGetUserInfo(JSONObject userInfo) {
        // Not implemented
    }

    @Override
    public void OnGetUserID(int id) {
        Log.d("MainActivity", Integer.toString(id));
    }
}
¶ Device identifier
The SDK collects and uses the most appropriate device ID:
- GAID (Google Advertising ID): on Android devices with Google Play Services.
- OAID (Open Anonymous Device Identifier): on Huawei devices.
- Generated UUID V4: when the above are not available.
Important conditions:
- Respect privacy preferences: if the user has disabled advertising tracking, the fallback is used.
- Respect family policies: if family protection policies are active, the fallback is used.
To obtain the device identifier, use the following method:
EMMA.getInstance().getDeviceId()
EMMA.getInstance().getDeviceId();
In addition, we can use it asynchronously, as shown in the following example, where we implement the EMMADeviceIdListener interface and use the getDeviceId() method. The device identifier is received in the onObtained() function, which must be implemented by the interface:
class MainActivity : BaseActivity(), EMMADeviceIdListener {

    override fun onCreate(savedInstanceState: Bundle?) {
        super.onCreate(savedInstanceState)
        setContentView(R.layout.activity_main)

        EMMA.getInstance().getDeviceId(deviceIdListener: this)
    }

    override fun onObtained(deviceId: String?) {
        Log.d("MainActivity", "DeviceId: $deviceId")
    }
}
public class MainActivity extends BaseActivity implements EMMADeviceIdListener {

    @Override
    protected void onCreate(Bundle savedInstanceState) {
        super.onCreate(savedInstanceState);
        setContentView(R.layout.activity_main);

        EMMA.getInstance().getDeviceId(this);
    }

    @Override
    public void onObtained(String deviceId) {
        Log.d("MainActivity", "DeviceId: " + deviceId);
    }
}
¶ Customer user identifier (Customer ID)
To send the customer ID independently of the login/registration use the following method:
EMMA.getInstance().setCustomerId("<Customer ID>")
EMMA.getInstance().setCustomerId("<Customer ID>");
¶ Link user email
Allows you to associate an email address with the user's device.
EMMA.getInstance().setEmail("<email>")
EMMA.getInstance().setEmail("<email>");
¶ Configure complete user profile
Allows you to configure the user profile completely, including customer ID, email (optional) and custom tags (optional) in a single call.
val tags = mapOf(
  "age" to "25",
  "gender" to "female",
  "city" to "Madrid"
)

EMMA.getInstance().setUserProfile("user_12345", "user@example.com", tags)
Map<String, String> tags = new HashMap<>();
tags.put("age", "25");
tags.put("gender", "female");
tags.put("city", "Madrid");

EMMA.getInstance().setUserProfile("user_12345", "user@example.com", tags);
¶ User language configuration
Manually sets the user's preferred language.
This method allows overwriting the default language of the device to set a custom language to be used in all SDK requests. This is useful in applications that allow the user to select a different language than the one configured on the device.
The language code in ISO 639-1 format must be used: es (Spanish), en (English), fr (French), de (German), it (Italian), zh-Hans (Simplified Chinese), zh-Hant (Traditional Chinese), etc.
        // In this case, it establishes English as the language
    EMMA.getInstance().setUserLanguage("en")
    // In this case, it establishes English as the language
    EMMA.getInstance().setUserLanguage("en");
If this method is not called, EMMA will default to the user's preferred language configured in the device system.
¶ Obtain user information
If we need to retrieve the user's profile from the application we will use the getUserInfo():
    class MainActivity : BaseActivity(), EMMAUserInfoInterface {

    override fun onCreate(savedInstanceState: Bundle?) {
        super.onCreate(savedInstanceState)
        setContentView(R.layout.activity_main)

        EMMA.getInstance().getUserInfo()
    }

    override fun OnGetUserInfo(userInfo: JSONObject?) {
      userInfo?.let {
      	// Do something with userInfo
      }
    }

    override fun OnGetUserID(id: Int) {
            // Not implemented
    }
}
public class MainActivity extends BaseActivity implements EMMAUserInfoInterface {

    @Override
    protected void onCreate(Bundle savedInstanceState) {
        super.onCreate(savedInstanceState);
        setContentView(R.layout.activity_main);

        EMMA.getInstance().getUserInfo();
    }

    @Override
    public void OnGetUserInfo(JSONObject userInfo) {
        if (userInfo != null) {
            // Do something with userInfo
        }
    }

    @Override
    public void OnGetUserID(int id) {
        // Not implemented
    }
}
¶ Installation attribution information
After the attribution process, EMMA makes the user's attribution information available to the SDK.
To get the attribution information we will use the getInstallAttributionInfo method:
    class MainActivity : BaseActivity() {

    override fun onCreate(savedInstanceState: Bundle?) {
        super.onCreate(savedInstanceState)
        setContentView(R.layout.activity_main)

 				EMMA.getInstance().getInstallAttributionInfo { attribution ->
            if (attribution != null) {
               // Do something with attribution
            }
        }
    }
}
public class MainActivity extends BaseActivity {

    @Override
    protected void onCreate(Bundle savedInstanceState) {
        super.onCreate(savedInstanceState);
        setContentView(R.layout.activity_main);

        EMMA.getInstance().getInstallAttributionInfo(new EMMAInstallAttributionInterface() {
            @Override
            public void onAttributionReceived(EMMAInstallAttribution attribution) {
                if (attribution != null) {
                    // Do something with attribution
                }
            }
        });
    }
}
See the description of attribution fields for available information.
¶ Advanced options
¶ Proguard
If you use proguard or a compatible alternative, below is an example of the contents of the proguard-rules.pro rules file. You may have to modify other rules depending on the application.
# EMMA SDK
-keep class io.emma.android.** { *; }

# Rules for play services ads identifier
-keep class com.google.android.gms.common.ConnectionResult {
    int SUCCESS;
}
-keep class com.google.android.gms.ads.identifier.AdvertisingIdClient {
    com.google.android.gms.ads.identifier.AdvertisingIdClient$Info getAdvertisingIdInfo(android.content.Context);
}
-keep class com.google.android.gms.ads.identifier.AdvertisingIdClient$Info {
    java.lang.String getId();
    boolean isLimitAdTrackingEnabled();
}

# Rule for google play referrer
-keep public class com.android.installreferrer.** { *; }

# Keep generic signatures; needed for correct type resolution
-keepattributes Signature

# Keep Gson annotations
-keepattributes RuntimeVisibleAnnotations,AnnotationDefault
-if class com.google.gson.reflect.TypeToken
-keep,allowobfuscation class com.google.gson.reflect.TypeToken
-keep,allowobfuscation class * extends com.google.gson.reflect.TypeToken
-keep,allowobfuscation,allowoptimization @com.google.gson.annotations.JsonAdapter class *
-keepclassmembers,allowobfuscation class * {
  @com.google.gson.annotations.Expose <fields>;
  @com.google.gson.annotations.JsonAdapter <fields>;
  @com.google.gson.annotations.Since <fields>;
  @com.google.gson.annotations.Until <fields>;
}

-keepclassmembers class * extends com.google.gson.TypeAdapter {
  <init>();
}
-keepclassmembers class * implements com.google.gson.TypeAdapterFactory {
  <init>();
}
-keepclassmembers class * implements com.google.gson.JsonSerializer {
  <init>();
}
-keepclassmembers class * implements com.google.gson.JsonDeserializer {
  <init>();
}

-if class *
-keepclasseswithmembers,allowobfuscation class <1> {
  @com.google.gson.annotations.SerializedName <fields>;
}
-if class * {
  @com.google.gson.annotations.SerializedName <fields>;
}
-keepclassmembers,allowobfuscation,allowoptimization class <1> {
  <init>();
}

# Rules for retrofit2
-keepattributes Signature, InnerClasses, EnclosingMethod
-keepattributes RuntimeVisibleAnnotations, RuntimeVisibleParameterAnnotations
-keepattributes AnnotationDefault
-keepclassmembers,allowshrinking,allowobfuscation interface * {
    @retrofit2.http.* <methods>;
}
-dontwarn org.codehaus.mojo.animal_sniffer.IgnoreJRERequirement
-dontwarn javax.annotation.**
-dontwarn kotlin.Unit
-dontwarn retrofit2.KotlinExtensions
-dontwarn retrofit2.KotlinExtensions$*
-if interface * { @retrofit2.http.* <methods>; }
-keep,allowobfuscation interface <1>

-if interface * { @retrofit2.http.* <methods>; }
-keep,allowobfuscation interface * extends <1>

-keep,allowobfuscation,allowshrinking class kotlin.coroutines.Continuation
-if interface * { @retrofit2.http.* public *** *(...); }
-keep,allowoptimization,allowshrinking,allowobfuscation class <3>

-keep,allowobfuscation,allowshrinking class retrofit2.Response

# Rules for okhttp3
-keepattributes Signature
-keepattributes Annotation
-keep class okhttp3.** { *; }
-keep interface okhttp3.** { *; }
-dontwarn okhttp3.**
-dontwarn okio.**

# Rules for glide (used to display images by sdk)
-keep class com.bumptech.glide.** { *; }
-dontwarn com.bumptech.glide.**

# Rules for push
-keep class com.google.firebase.** { *; }

# Rules for Huawei hms push and odid identifier
-ignorewarnings
-keepattributes *Annotation*
-keepattributes Exceptions
-keepattributes InnerClasses
-keepattributes Signature
-keepattributes SourceFile,LineNumberTable
-keep class com.huawei.hianalytics.**{*;}
-keep class com.huawei.updatesdk.**{*;}
-keep class com.huawei.hms.**{*;}

# Rules for Huawei ads-identifier and ads referrer
-keep class com.huawei.hms.ads.** { *; }
-keep interface com.huawei.hms.ads.** { *; }
¶ Use of custom proxy / custom webservice url
In some cases, it is necessary to change the EMMA API url (e.g. proxies), for this you have to add the following just before the startSession(...) method:
val configuration = EMMA.Configuration.Builder(this)
      .setSessionKey("example0ikl98")
      .setWebServiceUrl("https://www.your_proxy_url.com/")
      .setDebugActive(BuildConfig.DEBUG)
      .build()
EMMA.Configuration configuration = new EMMA.Configuration.Builder(this)
      .setSessionKey("example0ikl98")
      .setDebugActive(BuildConfig.DEBUG)
      .setWebserviceUrl("https://www.your_proxy_url.com/")
      .build();
¶ In-App Messaging Integration
EMMA includes 7 different communication formats that you can integrate to impact your users on Android:
- NativeAd - Format that integrates your communications always respecting the format and style of the contents of the App.
- StartView - Format that displays on the entire screen showing web content.
- AdBall - Communicative format in the form of a bubble, whose click triggers the display of web content.
- Banner - Basic format for your communications that you can use to communicate specific messages both above and below the screen.
- Strip - Communicative format that occupies the device's notification bar and displays a message from right to left.
- Coupon - Format that gives you the option to redeem coupons if you have a physical location by controlling the number of redemptions, the promotional code and the activation and end date.
- Custom plugins - Own communication format through NativeAd technology.
¶ NativeAd
¶ What is a NativeAd?
EMMA's NativeAds allow you to integrate personalised advertising that adapts to the design of your application. Unlike other formats (StartView, AdBall, etc.), you have complete control over how the content is displayed. EMMA provides the data (title, image, CTA, etc.) configured in the EMMA dashboard, and your app decides how to display it.
¶ Preconfiguration
Before requesting a NativeAd, you must:
- Create a template in the EMMA dashboard.
- Define the fields it will contain (title, image, description, CTA, etc.).
- Assign a unique identifier to the template.
For more details on how to configure a NativeAd in the dashboard, please refer to our main documentation.
¶ Get NativeAds
¶ Implement the interface
Depending on whether you want to obtain a single NativeAd or multiple ones:
// To obtain a NativeAd
class MyActivity : AppCompatActivity(), EMMANativeAdInterface {
    // ...
}

// To obtain multiple NativeAds
class MyActivity : AppCompatActivity(), EMMABatchNativeAdInterface {
    // ...
}
| Interface | Callback method | Use |
|---|---|---|
EMMANativeAdInterface |
onReceived(nativeAd) |
Get the latest NativeAd from a template |
EMMABatchNativeAdInterface |
onBatchReceived(nativeAds) |
Get all active NativeAds from a template |
¶ Request a unique NativeAd
class MyActivity : AppCompatActivity(), EMMANativeAdInterface {

    override fun onCreate(savedInstanceState: Bundle?) {
        super.onCreate(savedInstanceState)
        setContentView(R.layout.activity_main)

        requestNativeAd()
    }

    private fun requestNativeAd() {
        val request = EMMANativeAdRequest()
        request.templateId = "templateId"
        EMMA.getInstance().getInAppMessage(request, this)
    }

    override fun onReceived(nativeAd: EMMANativeAd) {
        // Process and display the NativeAd
        displayNativeAd(nativeAd)
    }

    override fun onShown(campaign: EMMACampaign) {
        // Optional: when the NativeAd is displayed
    }

    override fun onHide(campaign: EMMACampaign) {
        // Optional: when the NativeAd is hidden
    }

    override fun onClose(campaign: EMMACampaign) {
        // Optional: when the NativeAd closes
    }
}
¶ Request multiple NativeAds (batch)
class MyActivity : AppCompatActivity(), EMMABatchNativeAdInterface {

    private fun requestBatchNativeAds() {
        val request = EMMANativeAdRequest()
        request.templateId = "templateId"
        request.isBatch = true
        EMMA.getInstance().getInAppMessage(request, this)
    }

    override fun onBatchReceived(nativeAds: List<EMMANativeAd>) {
        // Process the NativeAds list
        nativeAds.forEach { nativeAd ->
            displayNativeAd(nativeAd)
        }
    }

    // Methods onShown, onHide, onClose...
}
¶ Working with data
¶ Access content
fun displayNativeAd(nativeAd: EMMANativeAd) {
    val content = nativeAd.nativeAdContent

    // Get fields by name (configured in the dashboard)
    val title = content["Title"]?.fieldValue
    val imageUrl = content["Main picture"]?.fieldValue
    val ctaText = content["CTA"]?.fieldValue

    // Validate that the necessary fields exist
    if (title != null && imageUrl != null) {
        // Update your UI with this data
        textViewTitle.text = title
        // Upload image

        // Important: send impression when displayed
        EMMA.getInstance().sendInAppImpression(
            CommunicationTypes.NATIVE_AD,
            nativeAd
        )
    }
}
¶ Working with containers
Containers allow you to group multiple elements together, which is useful for carousels or product lists:
fun displayContainerNativeAd(nativeAd: EMMANativeAd) {
    val content = nativeAd.nativeAdContent
    val containerField = content["container"]

    if (containerField?.getFieldType() == EMMANativeFieldType.Container) {
        val items = containerField.fieldContainer

        // Iterate over the elements of the container
        items?.forEach { item ->
            val title = item["Title"]?.fieldValue
            val image = item["Main picture"]?.fieldValue
            val cta = item["CTA"]?.fieldValue

            // Create UI element
            addItemToView(title, image, cta)
        }
    }

    // Track impression
    EMMA.getInstance().sendInAppImpression(
        CommunicationTypes.NATIVE_AD,
        nativeAd
    )
}
¶ Useful properties of NativeAd
val templateId = nativeAd.templateId  // Template ID
val tag = nativeAd.tag // Assigned tag
val campaignId = nativeAd.campaignID // Campaign ID
val params = nativeAd.params // Additional parameters
¶ Interactions and tracking
¶ Impression (mandatory)
You should always send an impression when displaying the NativeAd on screen:
EMMA.getInstance().sendInAppImpression(
    CommunicationTypes.NATIVE_AD,
    nativeAd
)
¶ Click: open NativeAd (recommended)
When the user clicks to open the NativeAd, use openNativeAd:
container.setOnClickListener {
    EMMA.getInstance().openNativeAd(nativeAd)
}
What does openNativeAd do?
- Open the NativeAd content (CTA configured in the dashboard).
- Automatically send click tracking.
¶ Manual click (alternative)
If you need to control the opening manually:
container.setOnClickListener {
    // Track the click
    EMMA.getInstance().sendInAppClick(
        CommunicationTypes.NATIVE_AD,
        nativeAd
    )

    // Open your own URL or custom action
    openCustomBrowser(nativeAd.cta)
}
¶ Dismissed click: rejection click
When the user closes or rejects the NativeAd without opening it:
closeButton.setOnClickListener {
    // Track rejection
    EMMA.getInstance().sendInAppDismissedClick(
        CommunicationTypes.NATIVE_AD,
        nativeAd
    )

    // Remove NativeAd from the UI
    removeNativeAdFromView()
}
When to use sendInAppDismissedClick?
| To use | Do not use |
|---|---|
| Close/delete button | Disappearance due to natural scrolling |
| Swipe to dismiss | Automatic timeout |
| User explicitly rejects | Navigating to another screen |
¶ Complete example
class NativeAdActivity : AppCompatActivity(), EMMANativeAdInterface {

    private var currentNativeAd: EMMANativeAd? = null

    override fun onCreate(savedInstanceState: Bundle?) {
        super.onCreate(savedInstanceState)
        setContentView(R.layout.activity_native_ad)

        // Request NativeAd
        val request = EMMANativeAdRequest()
        request.templateId = "templateId"
        EMMA.getInstance().getInAppMessage(request, this)
    }

    override fun onReceived(nativeAd: EMMANativeAd) {
        currentNativeAd = nativeAd
        val content = nativeAd.nativeAdContent

        // Obtain data
        val title = content["Title"]?.fieldValue ?: return
        val imageUrl = content["Image"]?.fieldValue

        // Display in UI
        textViewTitle.text = title
        imageUrl?.let { loadImage(it, imageView) }

        nativeAdContainer.visibility = View.VISIBLE

        // Track impression
        EMMA.getInstance().sendInAppImpression(
            CommunicationTypes.NATIVE_AD,
            nativeAd
        )

        // Click to open
        nativeAdContainer.setOnClickListener {
            EMMA.getInstance().openNativeAd(nativeAd)
        }

        // Click to close/reject
        buttonClose.setOnClickListener {
            EMMA.getInstance().sendInAppDismissedClick(
                CommunicationTypes.NATIVE_AD,
                nativeAd
            )
            nativeAdContainer.visibility = View.GONE
        }
    }

    override fun onShown(campaign: EMMACampaign) {}
    override fun onHide(campaign: EMMACampaign) {}
    override fun onClose(campaign: EMMACampaign) {}
}
¶ Best practices
¶ Do
- Send
sendInAppImpression()when the NativeAd is visible on screen. - Use
openNativeAd()to open and track in a single call. - Track
sendInAppDismissedClick()when the user dismisses the NativeAd. - Validate that mandatory fields exist before displaying.
- Handle optional fields with default values.
¶ Avoid
- Do not track multiple impressions for the same NativeAd.
- Do not call
sendInAppClick()andopenNativeAd()together (duplicate tracking). - Do not use
sendInAppDismissedClick()for automatic dismissals. - Do not display the NativeAd if mandatory fields are missing.
¶ StartView
The StartView is a communication format that allows you to display HTML content, hosted at a URL, in a full-screen WebView.
fun getStartView() {
  val startViewRequest = EMMAInAppRequest(EMMACampaign.Type.STARTVIEW)
  EMMA.getInstance().getInAppMessage(startViewRequest)
}
¶ AdBall
The AdBall is a small circular view that displays an image. This view can be dragged all over the screen and removed from it at any time, it contains a CTA which is a URL with HTML content that launches a WebView when clicked.
fun getAdBall() {
  val adBallRequest = EMMAInAppRequest(EMMACampaign.Type.ADBALL)
  EMMA.getInstance().getInAppMessage(adBallRequest)
}
¶ Banner
The banner is a communication format that allows to adapt an image or GIF in banner format within an application screen. This banner can be displayed on the screen where it is displayed or at the bottom of the screen. The banner contains a configurable CTA in the EMMA Dashboard and it can be a deeplink or an https url. In the case of the second option, when clicking it opens a WebView with the content of the url.
It is recommended to make the call after all the elements of the screen are loaded.
fun getBanner() {
  val bannerRequest = EMMAInAppRequest(EMMACampaign.Type.BANNER)
  EMMA.getInstance().getInAppMessage(bannerRequest);
}
¶ Strip
The strip allows you to display a banner at the top of the device's screen with a text that scrolls as a carousel. Variables such as the duration of the rotation or the display time are configurable from the Dashboard.
fun getStrip() {
  val stripRequest = EMMAInAppRequest(EMMACampaign.Type.STRIP)
  EMMA.getInstance().getInAppMessage(stripRequest);
}
¶ Coupon
EMMA Coupons allows you to obtain, verify and redeem coupons that have been defined and configured on the EMMA platform.
class CouponsActivity: BaseActivity(), EMMACouponsInterface {

    override fun onCreate(savedInstanceState: Bundle?) {
        super.onCreate(savedInstanceState)
        EMMA.getInstance().addCouponsCallback(this)
        getCoupons()
    }

    private fun getCoupons() {
        EMMA.getInstance().getInAppMessage(EMMAInAppRequest(EMMACampaign.Type.COUPON))
    }

    private fun getSingleCoupon() {
        val couponsRequest = EMMAInAppRequest(EMMACampaign.Type.COUPON)
        couponsRequest.inAppMessageId = "<COUPON_ID>"
        EMMA.getInstance().getInAppMessage(couponsRequest)
    }

    private fun redeemCoupon() {
        val redeemCouponRequest = EMMAInAppRequest(EMMACampaign.Type.REDEEM_COUPON)
        redeemCouponRequest.inAppMessageId = "<COUPON_ID>"
        EMMA.getInstance().getInAppMessage(redeemCouponRequest)
    }

    private fun cancelCoupon() {
        val cancelCouponRequest = EMMAInAppRequest(EMMACampaign.Type.CANCEL_COUPON)
        cancelCouponRequest.inAppMessageId = "<COUPON_ID>"
        EMMA.getInstance().getInAppMessage(cancelCouponRequest)
    }

    private fun couponValidRedeems() {
        val couponValidRedeems = EMMAInAppRequest(EMMACampaign.Type.COUPON_VALID_REDEEMS)
        couponValidRedeems.inAppMessageId = "<COUPON_ID>"
        EMMA.getInstance().getInAppMessage(couponValidRedeems)
    }

    override fun onCouponsReceived(coupons: List<EMMACoupon>) {
        coupons.let {
            // Show coupons
            coupons.forEach { coupon ->
                EMMA.getInstance().sendInAppImpression(CommunicationTypes.COUPON, coupon)
            }
        }
    }

    override fun onCouponsFailure() {
        print("An error has occurred obtaining coupons")
    }

    override fun onCouponRedemption(success: Boolean) {
        print("Coupon redemption success: $success")
    }

    override fun onCouponCancelled(success: Boolean) {
        print("Coupon cancelled success: $success")
    }

    override fun onCouponValidRedeemsReceived(numRedeems: Int) {
        print("Coupon redeems: $numRedeems")
    }
}
¶ Get coupons
With this call, we will obtain all the information of the coupons available to the user, according to the conditions that have been configured in the EMMA platform.
private fun getCoupons() {
  EMMA.getInstance().getInAppMessage(EMMAInAppRequest(EMMACampaign.Type.COUPON))
}
A list of existing coupons will be returned, listing first the automatic coupons sorted from most recent to oldest, and then the classic coupons will be listed, also sorted from most recent to oldest.
EMMACouponsInterface.onCouponsReceived is called in case the user has coupons available to redeem or EMMACouponsInterface.onCouponsFailure if the user has no coupons available. EMMACoupon contains all the information related to the coupon: id (EMMA's internal identifier), code, maximum number of redemptions, number of times redeemed, title, description, image...
If you want to send to EMMA the information about when the coupon has been clicked or when it is displayed on the screen, you have to add the following methods when both actions are performed in the app:
EMMA.getInstance().sendInAppImpression(CommunicationTypes.COUPON, couponCampaign);
EMMA.getInstance().sendInAppClick(CommunicationTypes.COUPON, couponCampaign);
¶ Cancel coupons
private fun cancelCoupon() {
  val cancelCouponRequest = EMMAInAppRequest(EMMACampaign.Type.CANCEL_COUPON)
  cancelCouponRequest.inAppMessageId = "<COUPON_ID>"
  EMMA.getInstance().getInAppMessage(cancelCouponRequest)
}
With this call you can cancel the redemption of a previously made coupon.
The parameter couponId must be the EMMA internal identifier of a coupon identifier that can be obtained from a call to getCoupons made previously. The EMMACouponsInterface.onCouponCancelled is called, where success indicates whether the coupon has been cancelled.
¶ Custom plugins
¶ Create plugin
As of version 4.9.0 the possibility to add in-app plugins to the SDK has been added. The in-app plugins work through NativeAd technology.
You can create your own communication format and turn it into an in-app plugin, for this it is necessary that the main class of the new format extends the abstract class EMMAInAppPlugin, this class forces to override two methods:
class CustomInAppPlugin: EMMAInAppPlugin() {

 override fun getId(): String = "emma-plugin-custom"

 override fun show(context: Activity?, nativeAd: EMMANativeAd) {
 // Process data
 }

 override fun dismiss() {
 }
The show() method is the main method as it is the one that launches the SDK when it receives the Native Ad corresponding to the plugin. The SDK passes to the plugin as context the current activity that is visible in the app and the NativeAd with the content according to the template marked as plugin in the Dashboard. With these parameters you can create any communication format adapted to the content of the NativeAd.
The dismiss() method is to hide the plugin automatically. At the moment the SDK does not have this functionality built in, it leaves the control of hiding to the plugin itself.
The getId() method returns the identifier of the plugin that corresponds to the templateId generated in the template.
The EMMAInAppPlugin class contains several static methods such as sendInAppImpression and sendInAppClick. As in NativeAd, you can send these actions. You can also invoke the inappMessageListener with the invokeShownListeners, invokeCloseListeners and invokeHideListeners methods.
You can check the plugin example here.
¶ Integrate plugin
To integrate a plugin it is necessary to add it in the sdk after the login, for this it is necessary to use the addInAppPlugin method.
class App: Application {

 override fun onCreate() {
   super.onCreate()
   ....
   EMMA.getInstance().startSession(configuration)
   EMMA.getInstance().addInAppPlugins(CustomPlugin())
 }

}
Once the sdk has the plugin you simply have to call it in the part of the app where it is required as if it were a NativeAd.
class MainActivity: AppCompatActivity() {

 override fun onCreate(savedInstanceState: Bundle?) {
   super.onCreate(savedInstanceState)
   setContentView(R.layout.activity_main)

   val request = EMMANativeAdRequest()
   request.templateId = "emma-plugin-custom"
   EMMA.getInstance().getInAppMessage(request)
 }

}
¶ Other In-App Messaging options
¶ EMMA Whitelist
With this functionality we can limit the urls that the EMMA SDK will open, so that in In-App communications, only content that begins with one of the urls that we have indicated in the whitelist will be shown in a Webview.
If we do not indicate any url in the whitelist, any url is allowed. This functionality would affect Push (Rich URL), Banners, StartViews and AdBalls. Communications (Banners, StartViews and AdBalls) that can load external content to the app through a Webview and for Banners and AdBalls could load external images that would also be controlled by the whitelist.
For a Push with Rich URL, if it does not comply, the corresponding Webview would not be opened, but the push does reach the application. Note that if instead of a url a deeplink is used, the deeplink scheme must be added to the whitelist to be able to open it.
fun enableWhitelist() {
    EMMA.getInstance().whitelist = mutableListOf("https://mydomain.com", "https://mydomain2.com")
}
¶ Examples
If my whitelist is "http://mydomain.com".
-
Upload to EMMA dashboard a Banner with Target URL https://mydomain.com.
The Banner will not be displayed, we should add https://mydomain.com to the whitelist. -
Configure a StartView with StartView URL http://www.mydomain.com in the EMMA dashboard.
The StartView will not be displayed, we should add http://www.mydomain.com to the whitelist. -
Configure in the EMMA dashboard a Banner with Target URL http://mydomain.com/my/url and SmartPhone Banner URL http://subdomain.mydomain.com/my/image.
The Banner will not be displayed, the url of the image does not comply with the whitelist, we should add to the whitelist http://subdomain.mydomain.com. -
We upload a Banner with Target URL http://mydomain.com/my/url/ to the EMMA dashboard.
The Banner will be displayed because the url entered in the Target URL field starts with the same protocol and domain as the whitelist url. -
We configure in the EMMA dashboard a StartView with StartView URL http://mydomain.com/mypage.html¶m=value.
The StartView will be displayed because the url entered in the StartView URL field starts with the same protocol and domain as the whitelist url.
¶ Control of the status of requests
The EMMA SDK allows you to manage the status of in-app message requests through the EMMARequestListener interface. This is useful to know in real time if an in-app campaign has been requested, if it comes with content that should be displayed or if it has failed.
Thus, and among other utilities, we can highlight that:
- It allows you to detect if there is content available (
containsData) and adapt your UI accordingly. - You can dynamically reserve space on the screen only when a campaign is active.
- Allows logging useful for tracking, A/B testing and error monitoring.
Example of implementation:
class MyActivity : AppCompatActivity() {

    companion object {
        private const val TAG = "EMMA_INAPP"
    }

    override fun onCreate(savedInstanceState: Bundle?) {
        super.onCreate(savedInstanceState)
        requestInAppMessage()
    }

    private fun requestInAppMessage() {
        val request = EMMAInAppRequest(EMMACampaign.Type.BANNER) // You can use .STARTVIEW, .STRIP, etc.
        request.customId = "MY_INAPP_REQUEST"
        request.requestListener = object : EMMARequestListener {
            override fun onStarted(id: String) {
                Log.d(TAG, "onStarted request with id: $id")
            }

            override fun onSuccess(id: String, containsData: Boolean) {
                Log.d(TAG, "onSuccess request with id: $id, containsData: $containsData")
                if (containsData) {
                    // Show message or prepare space in the UI or something else
                } else {
                    // If there is no content: hide or do not reserve space or something else
                }
            }

            override fun onFailed(id: String) {
                Log.d(TAG, "onFailed request with id: $id")
                // Handle error or show alternative UI
            }
        }

        EMMA.getInstance().inAppMessage(request)
    }
}
public class MyActivity extends AppCompatActivity {

    private static final String TAG = "EMMA_INAPP";

    @Override
    protected void onCreate(Bundle savedInstanceState) {
        super.onCreate(savedInstanceState);
        requestInAppMessage();
    }

    private void requestInAppMessage() {
        EMMAInAppRequest request = new EMMAInAppRequest(EMMACampaign.Type.BANNER); // You can use .STARTVIEW, .STRIP, etc.
        request.setCustomId("MY_INAPP_REQUEST");
        request.setRequestListener(new EMMARequestListener() {
            @Override
            public void onStarted(String id) {
                Log.d(TAG, "onStarted request with id: " + id);
            }

            @Override
            public void onSuccess(String id, boolean containsData) {
                Log.d(TAG, "onSuccess request with id: " + id + ", containsData: " + containsData);
                if (containsData) {
                    // Show message or prepare space in the UI or something else
                } else {
                    // If there is no content: hide or do not reserve space or something else
                }
            }

            @Override
            public void onFailed(String id) {
                Log.d(TAG, "onFailed request with id: " + id);
                // Handle error or show alternative UI
            }
        });

        EMMA.getInstance().inAppMessage(request);
    }
}
Summary of the methods of the EMMARequestListener:
| Method | When is it called | Possible uses |
|---|---|---|
onStarted |
Just before the request is sent | Start logs, display a load indicator, etc. |
onSuccess |
When the request is successfully completed | Verify containsData and adapt the UI |
onFailed |
If the request fails (network, server, etc.) | Show fallback, hide reserved space, etc. |
¶ Retrieve campaign parameters
Before proceeding, it is necessary to add the parameters to the communication in the EMMA dashboard so that the SDK picks them up and makes them available to the application. To learn more.
¶ NativeAd
We can get the campaign parameters once we have received the NativeAd, either in the onReceived method or in onBatchReceived. To learn more about its implementation.
Example of use with onReceived:
class NativeAdsActivity: BaseActivity(), EMMANativeAdInterface {
    // ...

    override fun onReceived(nativeAd: EMMANativeAd?) {
        print(nativeAd.params)
    }
}
¶ All other formats
For the StartView, AdBall, Strip and Banner formats, the campaign parameters are obtained through the methods provided by the EMMAInAppMessageInterface: onShown, onHide and onClose.
Each of these methods receives as parameter an instance of EMMACampaign, through which it is possible to access the campaign parameters through the campaign.params property.
Usage example:
// EMMAInAppMessageInterface implementation
class MainActivity : BaseActivity(), EMMAInAppMessageInterface {
    // ...

    override fun onShown(campaign: EMMACampaign) {
        if (campaign.params != null && campaign.params.isNotEmpty()) {
                     print(campaign.params)
        }
    }

    override fun onHide(campaign: EMMACampaign) {
        // Access to campaign.params if necessary
    }

    override fun onClose(campaign: EMMACampaign) {
        // Access to campaign.params if necessary
    }
}
¶ Close in-app messages programmatically
closeInAppMessage(EMMACampaign.Type type) programmatically closes an active in-app communication of the specified type.
EMMA.getInstance().closeInAppMessage(EMMACampaign.Type.BANNER);
Available types:
EMMACampaign.Type.BANNEREMMACampaign.Type.STRIPEMMACampaign.Type.ADBALLEMMACampaign.Type.STARTVIEW
¶ Disable advertising tracking
EMMA allows you to disable tracking for those users who express this wish.
This method is the best way to adapt to the new RGPD (General Data Protection Regulation).
The user's communication to express this do-not-track option must be handled by the app by making a call to the following method:
    public fun disableUserTracking(deleteUserData: Bool) {
        /*
         disableUserTracking() shuts down all communication with EMMA servers
         If deleteUserData is true; EMMA will remove this device data from
         their servers. This is a unrecoverable action.
        */
        EMMA.getInstance().disableUserTracking(deleteUserData)
    }
 public void disableUserTracking(boolean deleteUserData) {
    /*
     disableUserTracking() shuts down all communication with EMMA servers
     If deleteUserData is true; EMMA will remove this device data from
     their servers. This is a unrecoverable action.
    */
    EMMA.getInstance().disableUserTracking(deleteUserData)
}
In case you want to re-enable the user's communications, you can use this other method:
    public func enableUserTracking() {
        EMMA.getInstance().enableUserTracking()
    }
- public void enableUserTracking {
      EMMA.getInstance().enableUserTracking()
}
¶ Families Policy
For all apps that are within the "Designed for Families" program, they need to meet a series of requirements regarding the information to be shared, for this EMMA has enabled a property at the start session to ensure compliance with this policy.
import android.app.Application
import io.emma.android.EMMA

class ExampleApplication : Application() {

    override fun onCreate() {
        super.onCreate()

        val configuration = EMMA.Configuration.Builder(this)
            .setSessionKey("example0ikl98")
            .setDebugActive(BuildConfig.DEBUG)
            .setFamiliesPolicyTreatment(true)
            .build()

        EMMA.getInstance().startSession(configuration)
    }
}
import android.app.Application;
import io.emma.android.EMMA;

public class ExampleApplication extends Application {

    @Override
    public void onCreate() {
        super.onCreate();

        EMMA.Configuration configuration = new EMMA.Configuration.Builder(this)
                .setSessionKey("example0ikl98")
                .setFamiliesPolicyTreatment(true)
                .setDebugActive(BuildConfig.DEBUG)
                .build();

        EMMA.getInstance().startSession(configuration);
    }
}
In addition, it is also important to disable the permission to collect the Google Advertising ID in the AndroidManifest.
<uses-permission android:name="com.google.android.gms.permission.AD_ID"
 tools:node="remove"/>